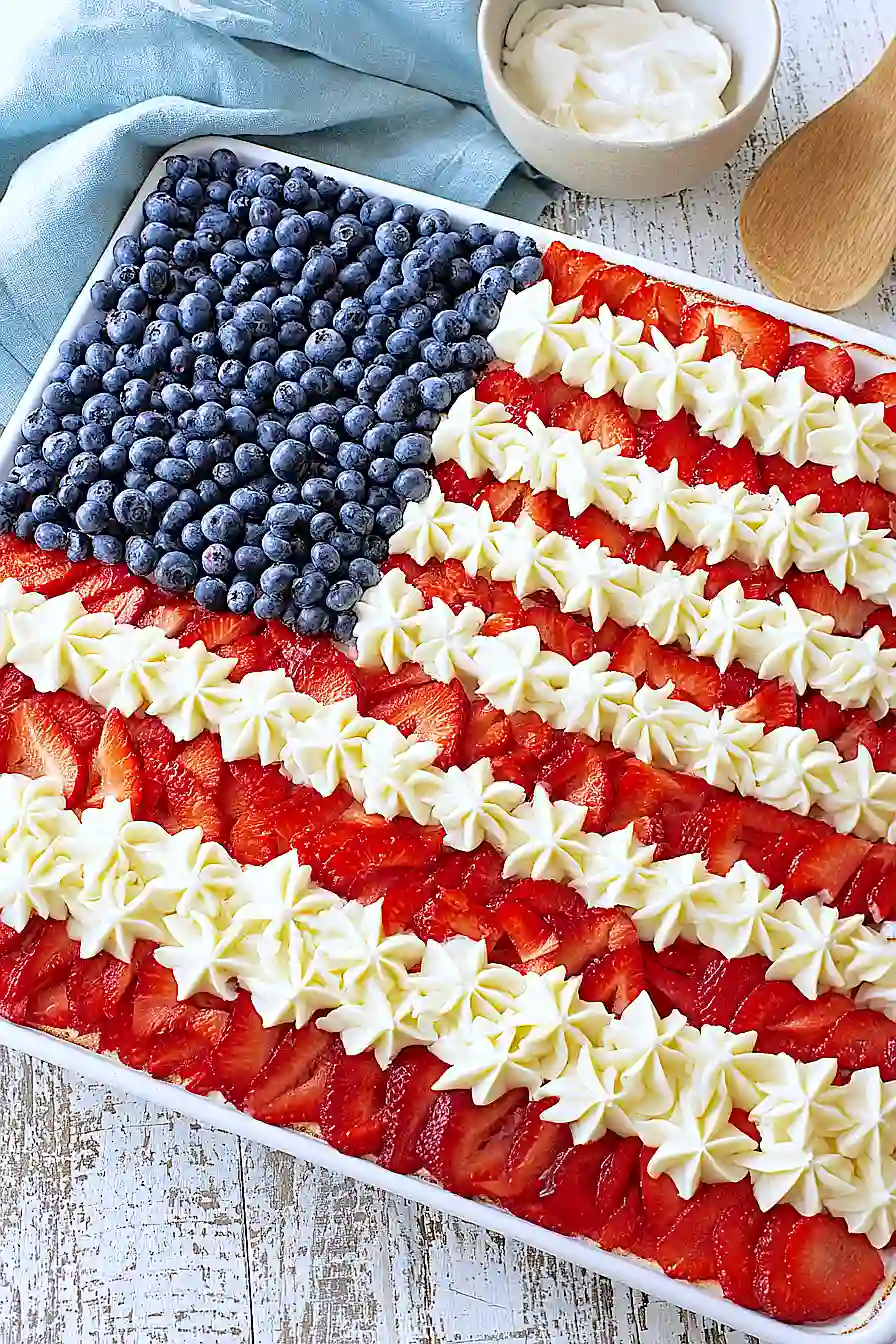
Okay I need to talk about this cake for a second because it makes me unreasonably happy.
Angel food, which I’ve always treated like this fussy, fragile diva of a cake (the ungreased pan situation?? the inverted cooling??). And then you pile it with whipped cream and arrange strawberries and blueberries into a flag and suddenly it’s the most festive thing on the table.
It’s light, it’s fluffy, it’s patriotic without being tacky. Perfect for the 4th, Memorial Day, or honestly any random Tuesday that needs a little celebration.
The technique is way easier than the reputation suggests. Egg whites + sugar + cream of tartar, whipped into oblivion, dry stuff folded in GENTLY (don’t deflate the cloud!!), baked, flipped upside down to cool. Weird but it works. Top with cream and berries. DONE.
Tips for Perfect Angel Food Cake
Room temperature egg whites whip to nearly DOUBLE the volume of cold ones, so set them out 30 minutes ahead. Wipe your bowl and beaters with vinegar to guarantee zero grease (even a fingerprint of fat sabotages your meringue).
Sift the flour and sugar FIVE times. Yes, five! This aerates the flour and is non-negotiable for the cake’s lift.
When folding dry ingredients in, stop when you still see a few flour streaks. Overmixing deflates the air you’ve worked so hard to build!
Do NOT grease the pan. The batter needs to cling to climb upward.
The moment the cake exits the oven, flip it upside down onto a bottle neck. Cool completely…. at least one hour, longer if you can wait.
How to Design the Flag Pattern
Step 1: CREATE THE CANTON. Place blueberries in a tight rectangle on the top-left section of the cake. This is your field of stars.
Step 2: STRIPE TIME. Arrange sliced strawberries in horizontal rows across the rest of the cake top, leaving space between each row for the whipped cream.
Step 3: ADD THE SEPARATORS. Pipe or spread thin lines of whipped cream between every strawberry row. This defines your stripes and completes the flag.
Chill for 15 minutes before serving so everything sets beautifully.
Make-Ahead & Storage Tips
- BAKE the un-topped cake up to 2 days ahead, UNCOVERED at room temp… covering traps moisture.
- FREEZE the bare cake in plastic for 2 months… thaw before decorating.
- Top with cream and berries within 2-3 hours of serving (they weep, sadly).
- STABILIZE whipped cream with 1 tsp cornstarch per cup to hold longer.
- Refrigerate leftovers, eat within 24 hours… angel food dries FAST once sliced.
Bake ahead, decorate at showtime. Fresh is the move!
What to Cook Next
- American Flag Cake Roll
- Brownie Flag Cake
- Strawberry Icebox Cake
- Layered Flag Ice Cream Cake
- Quick Flag Poke Cake
- Elegant Strawberry Chiffon Cake
Estimated Nutrition
Estimated nutrition for the whole recipe (without optional ingredients):
- Calories: 2250-2400
- Protein: 22-26 g
- Fat: 120-135 g
- Carbohydrates: 275-295 g
Ingredients
For the cake:
- 2/3 cup cake flour
- 1 1/4 cups sugar
- 1/2 teaspoon salt
- 1 cup egg whites, room temperature
- 1 1/4 teaspoons cream of tartar
- 1 teaspoon vanilla extract
- 1/4 teaspoon almond extract
For the topping:
- 2 cups heavy whipping cream, chilled
- 2/3 cup powdered sugar
- 2 teaspoons vanilla extract
- 1 1/2 cups strawberries, sliced
- 1 cup fresh blueberries
Step 1: Sift and Prep Dry Ingredients
- 2/3 cup cake flour
- 5/8 cup sugar
- 1/2 teaspoon salt
Preheat your oven to 375°F.
Sift together the cake flour and half of the sugar (5/8 cup) with the salt five times into a bowl—this aerates the flour and removes lumps, which is crucial for the delicate structure of angel food cake.
Set this dry mixture aside.
Ensure your egg whites are at room temperature and that all mixing bowls and beaters are completely grease-free, as even a trace of fat will prevent the egg whites from whipping properly.
Step 2: Beat the Egg Whites
- 1 cup egg whites, room temperature
- 1 1/4 teaspoons cream of tartar
- 1 teaspoon vanilla extract
- 1/4 teaspoon almond extract
- 5/8 cup sugar
In a large mixing bowl, beat the room-temperature egg whites at medium speed until they become frothy.
Add the cream of tartar and continue beating—the cream of tartar stabilizes the whites and helps them reach their full volume.
Once foamy, add the vanilla extract and almond extract, then gradually add the remaining 5/8 cup of sugar one tablespoon at a time while mixing at medium speed.
This slow addition of sugar helps create fine, stable air bubbles.
Step 3: Fold in the Flour Mixture
- whipped egg white mixture from Step 2
- dry ingredient mixture from Step 1
Increase the mixer speed to medium-high and continue beating until stiff peaks form—when you lift the beaters, the peaks should stand straight up.
Now carefully fold in the dry ingredient mixture from Step 1 in four additions, using a spatula and working gently to preserve the airiness of the whites.
After each addition, make only about 15-20 gentle folds until just combined—I like to stop when I still see just a few streaks of flour rather than overmixing, which deflates the meringue.
Step 4: Bake in Ungreased Pan
- batter from Step 3
Pour the batter into an ungreased 10-inch angel food cake pan (the ungreased surface helps the batter cling and rise).
Smooth the top gently with a spatula, then run a thin knife through the batter in a circular motion several times to break any large air pockets that would create tunnels in the finished cake.
Place in the preheated 375°F oven and bake for 15-20 minutes until the top is golden and springs back when lightly touched.
Step 5: Invert and Cool Entirely
As soon as the cake comes out of the oven, invert it onto a cooling rack or bottle neck—place the center tube of the pan over a bottle or cooling rack so air can circulate underneath.
This inverted position prevents the delicate cake from collapsing.
Let it cool completely for at least 1 hour (longer is fine, even overnight).
Once fully cooled, run a thin knife around the outer edge and around the center tube to loosen the cake, then gently turn it out onto a serving plate.
Step 6: Frost and Decorate with Berries
- 2 cups heavy whipping cream, chilled
- 2/3 cup powdered sugar
- 2 teaspoons vanilla extract
- 1 1/2 cups strawberries, sliced
- 1 cup fresh blueberries
- cooled cake from Step 5
In a chilled bowl, whip the heavy cream with the powdered sugar and vanilla extract until stiff peaks form.
Spread most of the whipped cream over the top and sides of the cooled cake.
Arrange the sliced strawberries and fresh blueberries in a flag pattern—typically strawberry stripes alternating with blueberry sections.
Pipe or dollop the remaining whipped cream decoratively between the strawberry rows for a festive finish.
I find it helpful to chill the assembled cake for 15-30 minutes before serving so the cream sets and the berries stay fresh.
Easy Angel Food Flag Cake
Ingredients
Method
- Preheat your oven to 375°F. Sift together the cake flour and half of the sugar (5/8 cup) with the salt five times into a bowl—this aerates the flour and removes lumps, which is crucial for the delicate structure of angel food cake. Set this dry mixture aside. Ensure your egg whites are at room temperature and that all mixing bowls and beaters are completely grease-free, as even a trace of fat will prevent the egg whites from whipping properly.
- In a large mixing bowl, beat the room-temperature egg whites at medium speed until they become frothy. Add the cream of tartar and continue beating—the cream of tartar stabilizes the whites and helps them reach their full volume. Once foamy, add the vanilla extract and almond extract, then gradually add the remaining 5/8 cup of sugar one tablespoon at a time while mixing at medium speed. This slow addition of sugar helps create fine, stable air bubbles.
- Increase the mixer speed to medium-high and continue beating until stiff peaks form—when you lift the beaters, the peaks should stand straight up. Now carefully fold in the dry ingredient mixture from Step 1 in four additions, using a spatula and working gently to preserve the airiness of the whites. After each addition, make only about 15-20 gentle folds until just combined—I like to stop when I still see just a few streaks of flour rather than overmixing, which deflates the meringue.
- Pour the batter into an ungreased 10-inch angel food cake pan (the ungreased surface helps the batter cling and rise). Smooth the top gently with a spatula, then run a thin knife through the batter in a circular motion several times to break any large air pockets that would create tunnels in the finished cake. Place in the preheated 375°F oven and bake for 15-20 minutes until the top is golden and springs back when lightly touched.
- As soon as the cake comes out of the oven, invert it onto a cooling rack or bottle neck—place the center tube of the pan over a bottle or cooling rack so air can circulate underneath. This inverted position prevents the delicate cake from collapsing. Let it cool completely for at least 1 hour (longer is fine, even overnight). Once fully cooled, run a thin knife around the outer edge and around the center tube to loosen the cake, then gently turn it out onto a serving plate.
- In a chilled bowl, whip the heavy cream with the powdered sugar and vanilla extract until stiff peaks form. Spread most of the whipped cream over the top and sides of the cooled cake. Arrange the sliced strawberries and fresh blueberries in a flag pattern—typically strawberry stripes alternating with blueberry sections. Pipe or dollop the remaining whipped cream decoratively between the strawberry rows for a festive finish. I find it helpful to chill the assembled cake for 15-30 minutes before serving so the cream sets and the berries stay fresh.