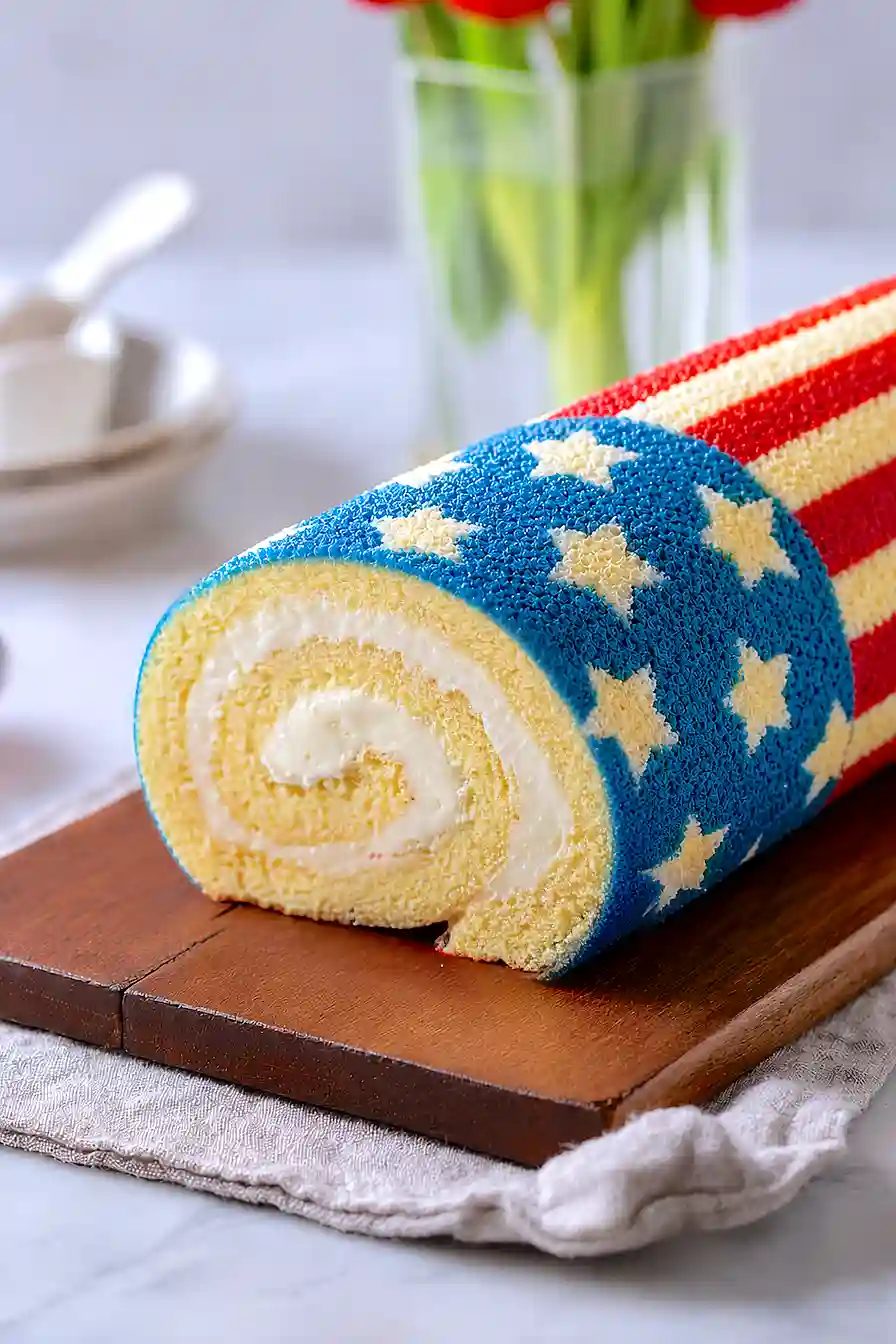
If you ask me, cake rolls are one of the best ways to celebrate the Fourth of July.
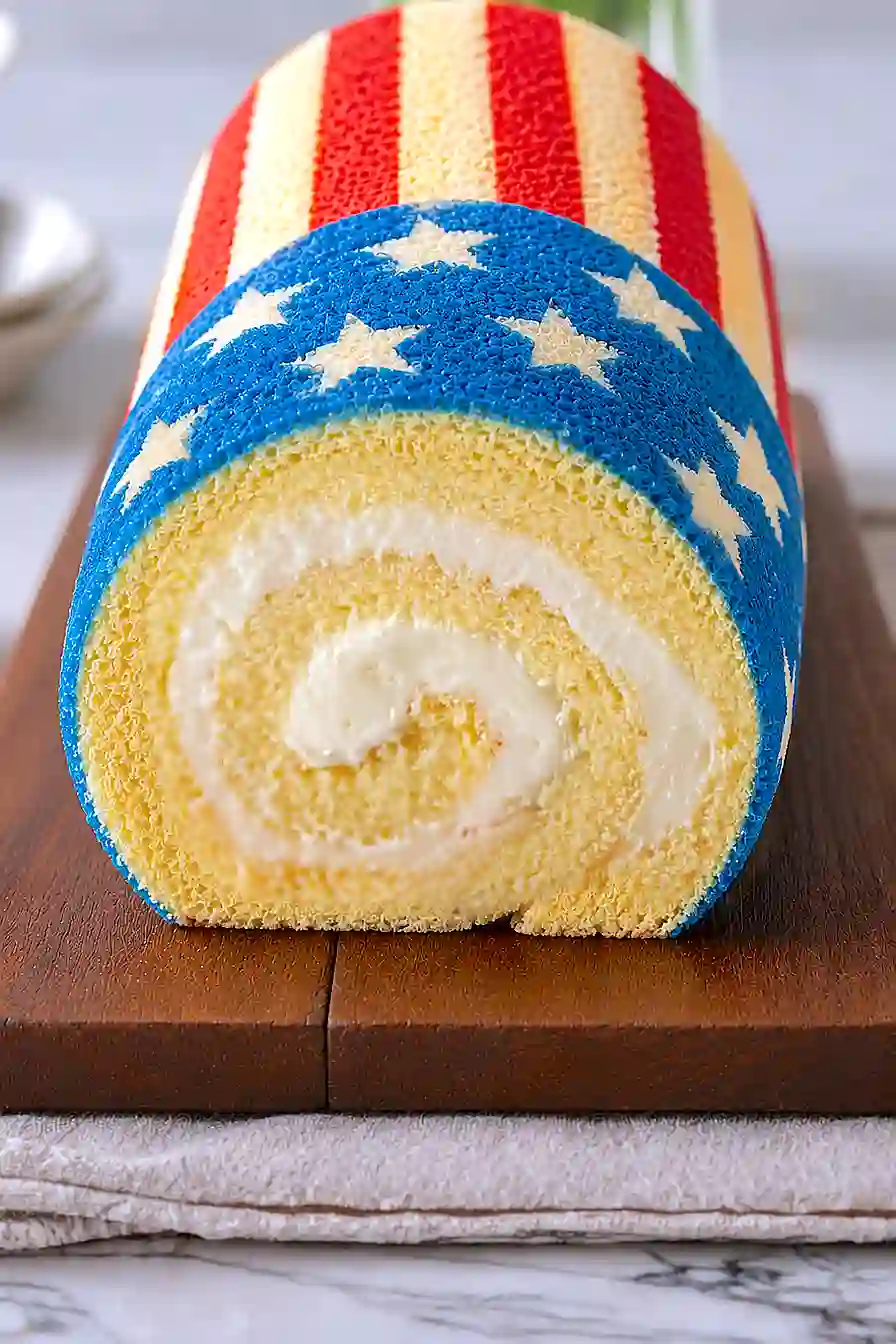
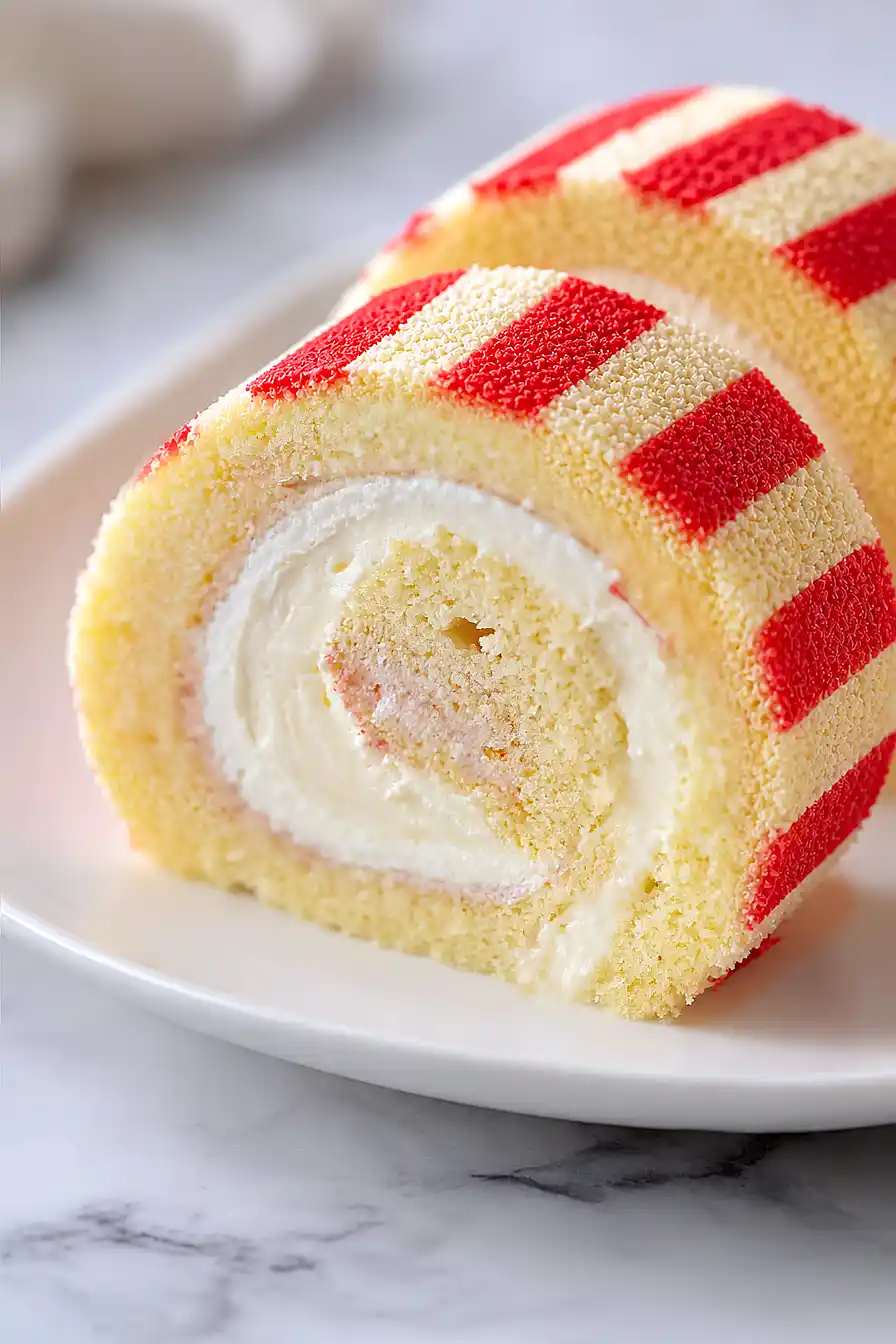
This patriotic dessert features a light sponge cake swirled with fresh whipped cream and strawberries. The soft, airy cake gets its color from a touch of food dye, making it perfect for the red, white, and blue theme.
It’s rolled up carefully while still warm and filled with homemade whipped cream sweetened with powdered sugar and brightened with a hint of lemon zest. Fresh strawberries add a pop of color and a sweet-tart flavor that balances the rich cream.
It’s a show-stopping centerpiece that’s easier to make than it looks, perfect for summer cookouts and holiday gatherings.
Why You’ll Love This Cake Roll
- Perfect for patriotic celebrations – This festive cake roll is ideal for Fourth of July, Memorial Day, or any summer gathering where you want to show your American pride in a delicious way.
- Impressive presentation – The colorful swirl pattern inside makes this cake look like you spent hours on it, but it’s actually straightforward to make once you get the hang of rolling.
- Light and fluffy texture – Unlike dense cakes, this sponge cake is airy and soft, making it a refreshing dessert that won’t weigh you down on a warm day.
- Customizable flavors – You can adjust the filling with different fruit options or stick with classic whipped cream and strawberries for a crowd-pleasing combination.
What Kind of Food Dye Should I Use?
For this recipe, you’ll definitely want to stick with gel food coloring rather than the liquid stuff you might have in your pantry. Gel food dye is much more concentrated, so you’ll get those bold red and blue colors needed for the American flag design without adding extra liquid that could mess with your cake’s texture. Liquid food coloring can make your batter too runny and won’t give you the same bright, patriotic colors. You can find gel food dye at most craft stores, baking supply shops, or even in the baking aisle of larger grocery stores – just look for small squeeze bottles or little pots of concentrated color.
Options for Substitutions
While this cake roll has some ingredients you really shouldn’t swap out, there are a few places where you can make changes if needed:
- Egg yolks and whites: This recipe really needs the 12 eggs separated – don’t try to substitute them. The egg whites create the airy structure that makes the cake roll without cracking, and the yolks add richness. This is one ingredient you’ll want to keep as is.
- Vegetable oil: You can use canola oil or any other neutral-flavored oil. Just avoid olive oil or coconut oil as their flavors will come through in the cake.
- Whole milk: 2% milk works fine here, or you can use buttermilk for a slightly tangier flavor. If using buttermilk, reduce the vinegar to 1/2 teaspoon.
- Gel food dye: Stick with gel food coloring for this recipe – liquid dyes will add too much moisture and can affect the cake’s texture. Gel dyes also give you those bright red and blue colors you need for the flag design.
- Heavy whipping cream: You really need heavy cream here to make a stable whipped cream filling that won’t make the cake soggy. Light cream or half-and-half won’t whip up properly.
- White vinegar: Lemon juice works just as well if you don’t have vinegar on hand – you just need that bit of acid to stabilize the egg whites.
Watch Out for These Mistakes While Baking
The biggest mistake when making a cake roll is overbaking, which causes the cake to crack when you try to roll it – check it at 8 minutes and remove it as soon as the top springs back when lightly touched.
Another common error is letting the cake cool completely before rolling, since a warm cake is flexible while a cold one will crack, so roll it in the damp cloth while it’s still hot from the oven.
When separating your 12 eggs, make absolutely sure no yolk gets into the whites, as even a tiny bit of fat will prevent the egg whites from reaching stiff peaks, which are essential for a light and airy cake.
Finally, use gel food coloring instead of liquid for your flag design – liquid dye adds extra moisture that can make your pattern bleed into the rest of the batter and ruin the crisp lines you’re going for.
What to Serve With American Flag Cake Roll?
This cake roll is pretty much a showstopper on its own, so I like to keep things simple when serving it. A scoop of vanilla ice cream on the side is always a good call, especially if you’re serving it at a summer barbecue or Fourth of July party. Fresh berries like blueberries and strawberries are perfect alongside each slice since they play into the red, white, and blue theme. If you want to add a little something extra, a cup of coffee or cold glass of milk makes this dessert feel even more special.
Storage Instructions
Store: Keep your cake roll wrapped tightly in plastic wrap in the fridge for up to 3 days. The whipped cream filling stays fresh and the cake stays moist when it’s properly covered. I like to wrap it in plastic first, then add a layer of foil to keep it extra fresh.
Freeze: You can freeze the cake roll for up to a month if you want to make it ahead for a party. Wrap it really well in plastic wrap and then foil before freezing. Just move it to the fridge the night before you need it to thaw slowly.
Serve: This cake tastes best when it’s cold, so slice it straight from the fridge. Use a sharp knife and wipe it clean between cuts to keep those pretty swirls looking nice. Let any leftover slices come to room temperature for about 10 minutes if you prefer a softer texture.
| Preparation Time | 45-60 minutes |
| Cooking Time | 10-15 minutes |
| Total Time | 120-135 minutes |
| Level of Difficulty | Hard |
| Servings | 10 slices |
Estimated Nutrition
Estimated nutrition for the whole recipe (without optional ingredients):
- Calories: 2600-2800
- Protein: 45-55 g
- Fat: 130-150 g
- Carbohydrates: 320-350 g
Ingredients
For the cake:
- 12 egg yolks (room temperature, about 70°F)
- 1/2 cup sugar (I always use C&H granulated sugar)
- 1/2 cup vegetable oil
- 1/2 cup milk
- 5 tsp vanilla
- 2 cups flour (I prefer King Arthur all-purpose flour for this cake)
- 1/3 cup cornstarch
- 1 tsp vinegar
- 12 egg whites
- 1/2 cup sugar
- 1 tsp food dye
For the filling and fruit:
- 1 1/4 cups cream (heavy whipping cream chilled for best volume)
- 6 tbsp powdered sugar (sifted to remove lumps)
- 1/4 tsp salt
- 1 1/2 tsp vanilla
- 1/2 tsp lemon zest
- 1 cup strawberries (sliced into 1/4-inch pieces)
Step 1: Prepare Mise en Place and Preheat
- Vegetable oil
- 2 cups flour
- 1/3 cup cornstarch
Heat your oven to 375°F and grease a 10×15 inch jelly roll pan, then line it with parchment paper and grease the parchment as well.
Separate your eggs carefully, ensuring no yolk gets into the whites—even a tiny bit of yolk will prevent the whites from whipping properly.
Measure out all your dry ingredients (flour and cornstarch) and sift them together into a bowl to remove lumps.
Have your milk, vanilla, vinegar, lemon zest, and food dye measured and ready.
Chill your heavy whipping cream in the refrigerator while you work on the cake.
Step 2: Create the Cake Batter Base
- 12 egg yolks
- 1/2 cup sugar
- 1/2 cup vegetable oil
- 1/2 cup milk
- 5 tsp vanilla
- dry flour mixture from Step 1
Whisk together the room temperature egg yolks with 1/2 cup sugar until the mixture is pale yellow and slightly thickened, about 2-3 minutes—this creaming step helps incorporate air and creates a lighter cake.
Slowly drizzle in the vegetable oil while whisking continuously to create an emulsion.
Add the milk and 5 teaspoons vanilla and whisk until combined.
Gently fold in the flour and cornstarch mixture from Step 1 using a spatula, being careful not to overmix—just combine until no flour streaks remain.
Step 3: Whip Egg Whites and Fold Into Batter
- 12 egg whites
- 1 tsp vinegar
- 1/2 cup sugar
- yolk batter from Step 2
In a separate clean bowl (even a tiny bit of oil will prevent proper whipping), beat the 12 egg whites with the vinegar using an electric mixer on medium-high speed for about 3-4 minutes until soft peaks form.
Gradually add 1/2 cup sugar while continuing to beat until stiff peaks form and the mixture is glossy, about another 2-3 minutes total.
Fold this meringue into the yolk batter from Step 2 in two additions, gently folding with a spatula rather than stirring to maintain the airiness—I like to fold just until a few white streaks remain with the first addition, then complete the folding with the second, as this prevents deflating the meringue.
Step 4: Pipe American Flag Design and Freeze
- 1 tsp food dye
- 1/2 cup cake batter from Step 3
Transfer about 1/2 cup of the batter to a small bowl and add 1 teaspoon of food dye (adjust the amount based on how intense you want the color), stirring until evenly tinted for your red stripes.
Transfer this colored batter to a piping bag fitted with a round tip (or use a squeeze bottle for easier control).
Pipe the red stripes and flag design onto the prepared parchment paper in the prepared pan.
Immediately place the pan in the freezer for exactly 5 minutes—this sets the design so it doesn’t blend into the base cake when you pour the remaining batter over it.
Step 5: Bake the Cake Roll
- remaining cake batter from Step 3
Remove the pan from the freezer and carefully pour the remaining cake batter from Step 3 over the frozen design, using an offset spatula to spread it evenly without disturbing the piped pattern below.
Bake for 8-10 minutes until the top is light golden and springs back when lightly touched with your finger—the cake should still be very tender and slightly underbaked because it will continue cooking slightly as it cools and sits on the warm pan.
The cake is done when a toothpick inserted in the center comes out mostly clean with just a few moist crumbs.
Step 6: Roll and Cool the Cake
Working quickly while the cake is still hot, place a damp kitchen cloth (about 16×20 inches) on your work surface and gently turn the hot cake out onto it.
Carefully peel off the parchment paper—the design should now be on the bottom of the cake facing down.
Starting from the short end, tightly roll the cake up in the damp cloth and let it cool on the counter for 1 hour.
The damp cloth helps the cake retain moisture and makes it easier to roll without cracking.
I let it cool completely at room temperature because this helps the cake set properly before filling.
Step 7: Prepare Filling and Assemble
- 1 1/4 cups heavy whipping cream
- 6 tbsp powdered sugar
- 1/4 tsp salt
- 1 1/2 tsp vanilla
- 1/2 tsp lemon zest
- 1 cup strawberries
- cooled cake roll from Step 6
While the cake cools, prepare the whipped cream filling by combining the chilled heavy whipping cream, 6 tablespoons sifted powdered sugar, 1/4 teaspoon salt, 1 1/2 teaspoons vanilla, and 1/2 teaspoon lemon zest in a bowl.
Beat with an electric mixer on medium-high speed for about 2-3 minutes until stiff peaks form—be careful not to overmix or you’ll get butter.
Once the cake has cooled, unroll it gently from the cloth onto your work surface (the flag design is now on top).
Spread the whipped cream evenly over the interior of the cake, leaving a 1/2-inch border around the edges.
Distribute the sliced strawberries evenly over the cream, then tightly roll the cake back up without the cloth.
Transfer to a serving platter, cover, and refrigerate for 15-20 minutes before slicing to help it set.
Best American Flag Cake Roll
Ingredients
Method
- Heat your oven to 375°F and grease a 10x15 inch jelly roll pan, then line it with parchment paper and grease the parchment as well. Separate your eggs carefully, ensuring no yolk gets into the whites—even a tiny bit of yolk will prevent the whites from whipping properly. Measure out all your dry ingredients (flour and cornstarch) and sift them together into a bowl to remove lumps. Have your milk, vanilla, vinegar, lemon zest, and food dye measured and ready. Chill your heavy whipping cream in the refrigerator while you work on the cake.
- Whisk together the room temperature egg yolks with 1/2 cup sugar until the mixture is pale yellow and slightly thickened, about 2-3 minutes—this creaming step helps incorporate air and creates a lighter cake. Slowly drizzle in the vegetable oil while whisking continuously to create an emulsion. Add the milk and 5 teaspoons vanilla and whisk until combined. Gently fold in the flour and cornstarch mixture from Step 1 using a spatula, being careful not to overmix—just combine until no flour streaks remain.
- In a separate clean bowl (even a tiny bit of oil will prevent proper whipping), beat the 12 egg whites with the vinegar using an electric mixer on medium-high speed for about 3-4 minutes until soft peaks form. Gradually add 1/2 cup sugar while continuing to beat until stiff peaks form and the mixture is glossy, about another 2-3 minutes total. Fold this meringue into the yolk batter from Step 2 in two additions, gently folding with a spatula rather than stirring to maintain the airiness—I like to fold just until a few white streaks remain with the first addition, then complete the folding with the second, as this prevents deflating the meringue.
- Transfer about 1/2 cup of the batter to a small bowl and add 1 teaspoon of food dye (adjust the amount based on how intense you want the color), stirring until evenly tinted for your red stripes. Transfer this colored batter to a piping bag fitted with a round tip (or use a squeeze bottle for easier control). Pipe the red stripes and flag design onto the prepared parchment paper in the prepared pan. Immediately place the pan in the freezer for exactly 5 minutes—this sets the design so it doesn't blend into the base cake when you pour the remaining batter over it.
- Remove the pan from the freezer and carefully pour the remaining cake batter from Step 3 over the frozen design, using an offset spatula to spread it evenly without disturbing the piped pattern below. Bake for 8-10 minutes until the top is light golden and springs back when lightly touched with your finger—the cake should still be very tender and slightly underbaked because it will continue cooking slightly as it cools and sits on the warm pan. The cake is done when a toothpick inserted in the center comes out mostly clean with just a few moist crumbs.
- Working quickly while the cake is still hot, place a damp kitchen cloth (about 16x20 inches) on your work surface and gently turn the hot cake out onto it. Carefully peel off the parchment paper—the design should now be on the bottom of the cake facing down. Starting from the short end, tightly roll the cake up in the damp cloth and let it cool on the counter for 1 hour. The damp cloth helps the cake retain moisture and makes it easier to roll without cracking. I let it cool completely at room temperature because this helps the cake set properly before filling.
- While the cake cools, prepare the whipped cream filling by combining the chilled heavy whipping cream, 6 tablespoons sifted powdered sugar, 1/4 teaspoon salt, 1 1/2 teaspoons vanilla, and 1/2 teaspoon lemon zest in a bowl. Beat with an electric mixer on medium-high speed for about 2-3 minutes until stiff peaks form—be careful not to overmix or you'll get butter. Once the cake has cooled, unroll it gently from the cloth onto your work surface (the flag design is now on top). Spread the whipped cream evenly over the interior of the cake, leaving a 1/2-inch border around the edges. Distribute the sliced strawberries evenly over the cream, then tightly roll the cake back up without the cloth. Transfer to a serving platter, cover, and refrigerate for 15-20 minutes before slicing to help it set.