Forget the vanilla sheet cake with cool whip and a vaguely flag-shaped berry situation. THIS is the flag cake.
Dense, fudgy brownies under a thick layer of tangy cream cheese frosting, with blueberries and raspberries doing the actual ‘merica work.
My neighbor took one bite at our block party last summer and asked if I’d consider doing this as a side hustle. Kids lose their MINDS. Adults lose their MINDS. 4th of July has a dessert, and this is it.
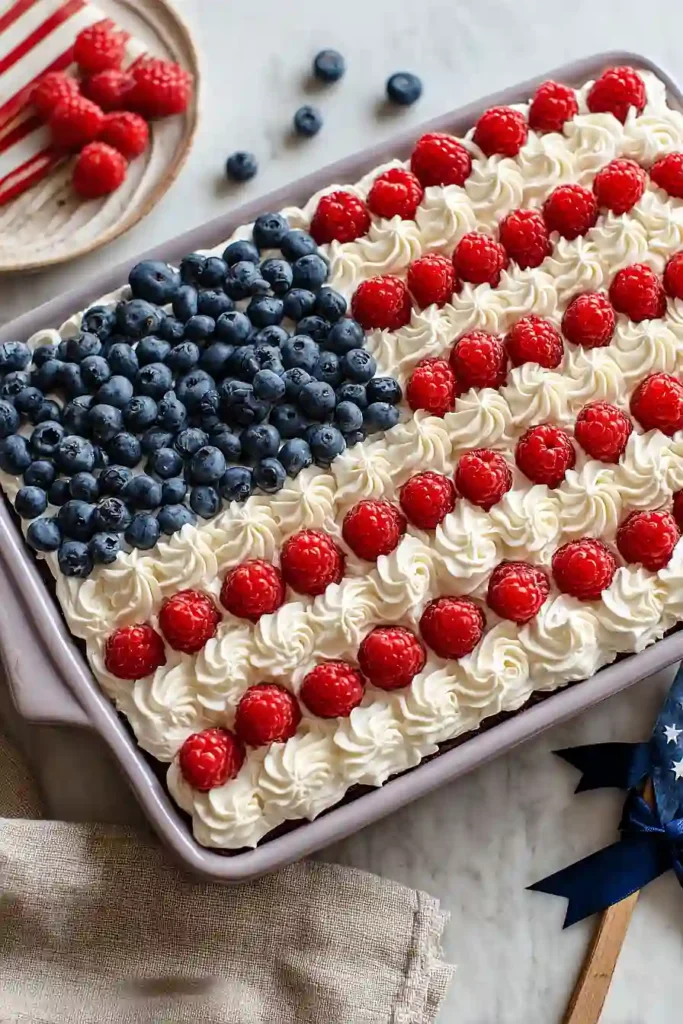
How to Design the Flag Pattern
Start in ONE corner with the blueberries, pressing them into the frosting in a tight 8×7 grid. Count your rows, friend… no eyeballing allowed, the star field must be CRISP!
Build your raspberry stripes in horizontal rows, leaving 1-2 INCHES of frosting visible between each line. Pipe extra frosting in those gaps to make those stripes POP!
Tips for Fudgy (Not Cakey) Brownies
- UNDERBAKE on purpose…. pull the pan when the toothpick still shows moist crumbs. Carryover heat does the rest.
- MELT real chocolate WITH the butter. Cocoa powder alone = cake. Period.
- Brown sugar beats white sugar for fudginess. Every. Single. Time.
- Room temp eggs ONLY. Cold ones shock the chocolate (and your fudgy dreams).
- STOP stirring once flour disappears. Overmixing = gluten = cakey.
- Cool FULLY before slicing. Fudgy needs time to set.
Fudgy is a science, not luck. Follow these and you’ll never pass off cake as a brownie again.
Make-Ahead & Storage Tips
Bake the brownie base up to TWO DAYS ahead, wrap it tight at room temperature (flavor deepens overnight, you’re welcome). Store frosting in the fridge for up to FIVE DAYS, just re-beat briefly before spreading.
Assemble the day you serve it. Berries start weeping after 8 hours, so don’t get fancy too early! Leftovers keep THREE DAYS in a sealed container in the fridge. Frosting softens, but who cares… still incredible.
How to Get Clean, Sharp Slices
- CHILL the cake for at least 30 minutes (longer is even better!) so the frosting firms up and won’t smear.
- Grab a sharp, thin-bladed knife… a long chef’s knife works beautifully here.
- Run the blade under hot water and wipe it DRY before each cut.
- Slice with a gentle sawing motion (don’t press down hard) for crisp edges every single time.
- Wipe the knife clean between slices so frosting doesn’t drag across your pretty flag design.
Estimated Nutrition
Estimated nutrition for the whole recipe (without optional ingredients):
- Calories: 6700-7300
- Protein: 65-75 g
- Fat: 375-410 g
- Carbohydrates: 830-900 g
Ingredients
For the brownie base:
- 1 cup butter (I like Kerrygold unsalted butter for this)
- 2 cups chocolate chips (melted and cooled slightly)
- 1 tablespoon vanilla bean paste
- 1 cup flour (I always use King Arthur all-purpose flour)
- 1/2 cup cocoa powder
- 1/3 cup sugar
- 1 1/2 cups brown sugar
- 6 eggs (room temperature, about 70°F)
- 3/4 tsp salt
- 1/2 teaspoon espresso powder
For the frosting:
- 1/2 cup butter
- 8 oz cream cheese (I prefer Philadelphia brand for a stable frosting)
- 4 cups icing sugar (sifted to remove lumps)
- 1 teaspoon vanilla bean paste
- 2 tbsp milk
- 1 pinch fine sea salt
For the decoration:
- 1 cup blueberries
- 2 cups raspberries
Step 1: Prep Ingredients and Oven
- 6 eggs
- 1 cup flour
- 1/2 cup cocoa powder
- 3/4 tsp salt
- 1/2 teaspoon espresso powder
Preheat your oven to 350°F and grease a 9×13 inch baking pan with butter or cooking spray.
Separate your room temperature eggs into a bowl.
Sift together the flour, cocoa powder, salt, and espresso powder in a separate bowl to remove any lumps and ensure even distribution of the cocoa and espresso—this prevents pockets of concentrated flavor in the finished brownie.
Have all your ingredients measured and ready before you begin mixing.
Step 2: Mix the Chocolate Batter
- 1 cup butter
- 2 cups chocolate chips
- 1/3 cup sugar
- 1 1/2 cups brown sugar
- 1 tablespoon vanilla bean paste
- dry ingredient mixture from Step 1
Melt 1 cup butter with 2 cups chocolate chips using a double boiler or microwave in 30-second intervals, stirring between each interval to avoid scorching.
Let the mixture cool for 5 minutes, then add it to your eggs along with both sugars (1/3 cup sugar and 1 1/2 cups brown sugar) and vanilla bean paste.
Whisk vigorously for about 2 minutes until the mixture is well combined and slightly fluffy.
I like to use an extra egg yolk whisked in separately to ensure the richest brownie, but it’s optional.
Fold in the dry ingredient mixture from Step 1 until just combined—don’t overmix, as this keeps the brownies tender.
Step 3: Bake the Chocolate Base
- brownie batter from Step 2
Pour the batter from Step 2 into your prepared 9×13 inch pan, spreading it evenly with a spatula.
Bake for 35-40 minutes, until a toothpick inserted in the center comes out with just a few moist crumbs—don’t overbake, as the residual heat will continue cooking the brownie after it leaves the oven.
The edges should pull slightly away from the pan sides.
Remove from the oven and let cool completely on a wire rack (about 1 hour) before frosting.
Step 4: Whip the Cream Cheese Frosting
- 1/2 cup butter
- 8 oz cream cheese
- 4 cups icing sugar
- 1 teaspoon vanilla bean paste
- 2 tbsp milk
- 1 pinch fine sea salt
While the brownie cools, beat 1/2 cup softened butter with 8 oz cream cheese until light and fluffy (about 2-3 minutes).
I prefer Philadelphia brand cream cheese because it creates a more stable, less grainy frosting than store brands.
Gradually add 4 cups sifted icing sugar in batches, beating on low speed after each addition to avoid a sugar cloud.
Add 1 teaspoon vanilla bean paste, 2 tablespoons milk, and a pinch of fine sea salt, then beat until smooth and spreadable.
The frosting should be thick but not stiff.
Step 5: Arrange the Berry Stars and Stripes
- 2/3 of frosting from Step 4
- 1 cup blueberries
- 2 cups raspberries
Spread about two-thirds of the frosting from Step 4 evenly over the cooled brownie using an offset spatula or butter knife.
Starting in one corner, arrange 1 cup blueberries in a tight 8×7 grid pattern to represent the stars on a flag.
Then create horizontal stripes across the remaining brownie by arranging 2 cups raspberries in rows with about 1-2 inches of space between each row, leaving frosting visible between the raspberry lines.
Step 6: Pipe Final Details and Chill
- remaining 1/3 frosting from Step 4
Transfer the remaining one-third of frosting from Step 4 to a piping bag fitted with a small round or star tip.
Pipe lines of frosting between each raspberry row to define the stripes and create a polished presentation.
Chill the completed cake for at least 30 minutes before cutting to allow the frosting to set and make slicing cleaner.
Cut into squares and serve.
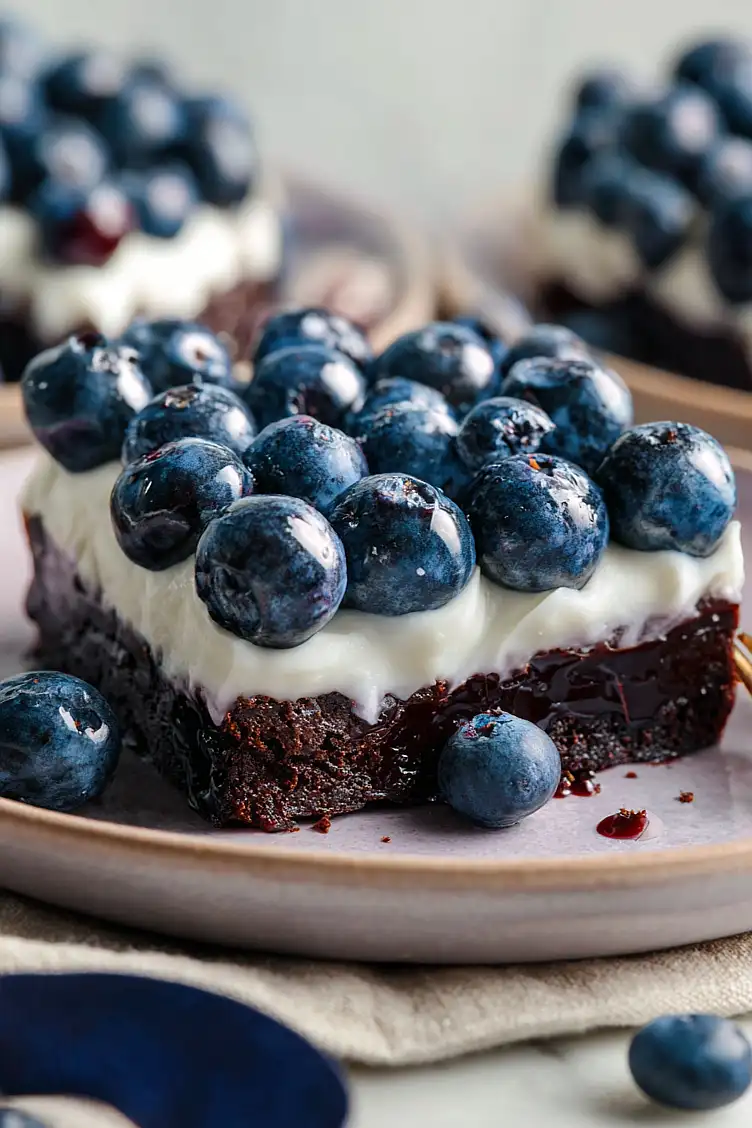
Patriotic Brownie Flag Cake
Ingredients
Method
- Preheat your oven to 350°F and grease a 9×13 inch baking pan with butter or cooking spray. Separate your room temperature eggs into a bowl. Sift together the flour, cocoa powder, salt, and espresso powder in a separate bowl to remove any lumps and ensure even distribution of the cocoa and espresso—this prevents pockets of concentrated flavor in the finished brownie. Have all your ingredients measured and ready before you begin mixing.
- Melt 1 cup butter with 2 cups chocolate chips using a double boiler or microwave in 30-second intervals, stirring between each interval to avoid scorching. Let the mixture cool for 5 minutes, then add it to your eggs along with both sugars (1/3 cup sugar and 1 1/2 cups brown sugar) and vanilla bean paste. Whisk vigorously for about 2 minutes until the mixture is well combined and slightly fluffy. I like to use an extra egg yolk whisked in separately to ensure the richest brownie, but it’s optional. Fold in the dry ingredient mixture from Step 1 until just combined—don’t overmix, as this keeps the brownies tender.
- Pour the batter from Step 2 into your prepared 9×13 inch pan, spreading it evenly with a spatula. Bake for 35-40 minutes, until a toothpick inserted in the center comes out with just a few moist crumbs—don’t overbake, as the residual heat will continue cooking the brownie after it leaves the oven. The edges should pull slightly away from the pan sides. Remove from the oven and let cool completely on a wire rack (about 1 hour) before frosting.
- While the brownie cools, beat 1/2 cup softened butter with 8 oz cream cheese until light and fluffy (about 2-3 minutes). I prefer Philadelphia brand cream cheese because it creates a more stable, less grainy frosting than store brands. Gradually add 4 cups sifted icing sugar in batches, beating on low speed after each addition to avoid a sugar cloud. Add 1 teaspoon vanilla bean paste, 2 tablespoons milk, and a pinch of fine sea salt, then beat until smooth and spreadable. The frosting should be thick but not stiff.
- Spread about two-thirds of the frosting from Step 4 evenly over the cooled brownie using an offset spatula or butter knife. Starting in one corner, arrange 1 cup blueberries in a tight 8×7 grid pattern to represent the stars on a flag. Then create horizontal stripes across the remaining brownie by arranging 2 cups raspberries in rows with about 1-2 inches of space between each row, leaving frosting visible between the raspberry lines.
- Transfer the remaining one-third of frosting from Step 4 to a piping bag fitted with a small round or star tip. Pipe lines of frosting between each raspberry row to define the stripes and create a polished presentation. Chill the completed cake for at least 30 minutes before cutting to allow the frosting to set and make slicing cleaner. Cut into squares and serve.