I didn’t try chiffon cake until I was in my thirties, and I honestly thought it would be too hard to make at home. It always looked so fluffy and perfect in bakery windows that I figured you needed special equipment or years of pastry school.
Turns out, chiffon cake is actually pretty forgiving if you follow a few simple rules. The secret is in how you treat those egg whites—they need to be at room temperature and whipped just right. Once you get that down, the rest is just careful folding and patience. And when you top it with fresh strawberries and homemade whipped cream? It’s the kind of dessert that makes people think you spent all day in the kitchen, even though you didn’t.
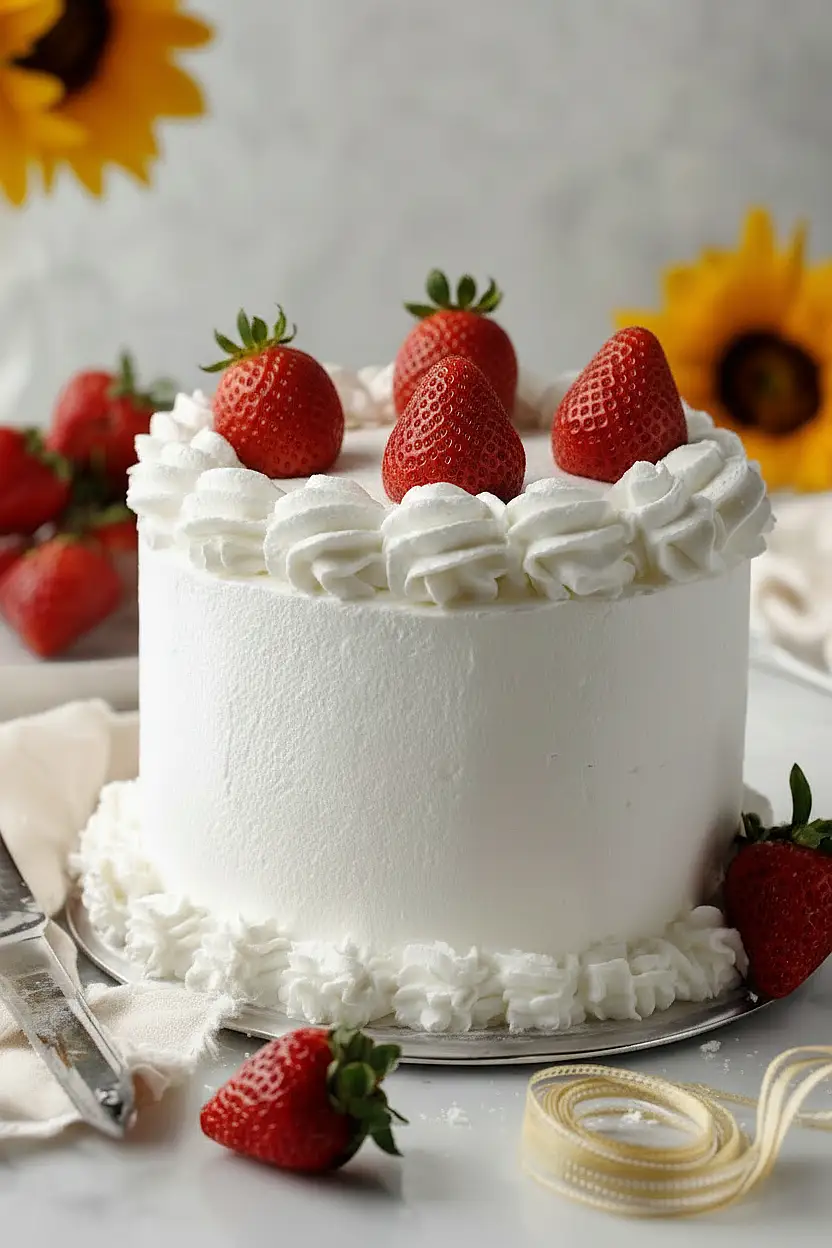
Why You’ll Love This Strawberry Chiffon Cake
- Light and fluffy texture – The chiffon cake is incredibly airy and soft, making it feel less heavy than traditional cakes while still being satisfying.
- Fresh strawberry flavor – Real strawberries in the cream filling and on top give you that fresh, fruity taste that’s perfect for spring and summer gatherings.
- Impressive presentation – This cake looks like something from a bakery, but you can make it at home with basic ingredients and a little patience.
- Perfect for special occasions – Whether it’s a birthday, Mother’s Day, or just a weekend treat, this cake feels special enough to celebrate any moment.
What Kind of Strawberries Should I Use?
Fresh strawberries are definitely the way to go for this cake, and you’ll want to pick ones that are ripe but still firm enough to hold their shape when diced. Look for berries that are bright red all the way through without white or green shoulders, and give them a sniff – they should smell sweet and fragrant. If strawberries aren’t in season, you can use frozen strawberries that have been thawed and patted dry, though fresh will give you better texture and flavor. Just make sure to wash and hull your berries well, and if they’re particularly juicy, let the diced pieces sit on a paper towel for a few minutes to absorb excess moisture before folding them into your cream.
Options for Substitutions
This cake recipe has some room for flexibility, though a few ingredients are best kept as-is:
- Cake flour: Don’t have cake flour? You can make your own by measuring 100g of all-purpose flour, removing 2 tablespoons, and replacing it with 2 tablespoons of cornstarch. Sift it together a few times to combine well.
- Cream of tartar: If you’re out of cream of tartar, substitute with 1/2 teaspoon of lemon juice or white vinegar. This helps stabilize the egg whites just as well.
- Oil: Any neutral oil works here – vegetable, canola, or grapeseed oil are all good choices. Avoid olive oil as it has too strong a flavor for this delicate cake.
- Heavy cream: Heavy cream is really important for the frosting to hold its shape properly, so I’d recommend sticking with it rather than substituting with lighter cream.
- Milk: Whole milk is best, but you can use 2% milk if needed. For a dairy-free option, try unsweetened almond or oat milk.
- Egg whites and yolks: The eggs are essential for this chiffon cake’s structure, so don’t substitute these – they’re what makes the cake light and airy.
Watch Out for These Mistakes While Baking
The biggest mistake when making chiffon cake is deflating those carefully beaten egg whites – always fold them into the batter gently using a spatula in a sweeping motion from the bottom up, never stirring or mixing vigorously.
Greasing the pan is another common error that will ruin your cake, since chiffon needs to cling to the sides as it rises and cools upside down, so stick with ungreased pans lined only with parchment on the bottom.
When it comes to assembly, spreading whipped cream on warm cake layers will cause it to melt and slide right off, so make sure your cakes are completely cool to the touch before you start layering.
Finally, don’t skip the chilling steps between frosting layers – rushing this process means your cake won’t hold its shape and the cream will be too soft to work with when you’re trying to create a smooth finish.
What to Serve With Strawberry Chiffon Cake?
This light and airy cake is perfect on its own, but I love serving it with a cup of hot tea or coffee for an afternoon treat. If you want to make it feel a bit fancier, add a scoop of vanilla ice cream or a dollop of extra whipped cream on the side. Fresh berries like raspberries or blueberries are great to serve alongside since they complement the strawberries in the cake without making things too heavy. For a brunch setting, this cake pairs beautifully with mimosas or fresh-squeezed orange juice.
Storage Instructions
Store: Keep your strawberry chiffon cake covered in the refrigerator since it has fresh whipped cream and strawberries. It’ll stay fresh for about 2-3 days in an airtight container or under a cake dome. The cake might lose a bit of its fluffiness over time, but it’ll still taste great.
Freeze: You can freeze just the unfrosted cake layers wrapped tightly in plastic wrap for up to 2 months. I don’t recommend freezing the assembled cake with the whipped cream frosting, as the texture won’t be quite the same when thawed.
Serve: This cake is best enjoyed cold straight from the fridge. Let it sit out for about 10 minutes before serving if you prefer it slightly less chilled. The whipped cream stays nice and stable when kept cold, so there’s no need to bring it to room temperature.
| Preparation Time | 90-100 minutes |
| Cooking Time | 25-30 minutes |
| Total Time | 240-270 minutes |
| Level of Difficulty | Hard |
| Servings | 8 slices |
Estimated Nutrition
Estimated nutrition for the whole recipe (without optional ingredients):
- Calories: 2000-2200
- Protein: 32-38 g
- Fat: 120-130 g
- Carbohydrates: 210-230 g
Ingredients
For the meringue base:
- 5 egg whites (room temperature, about 70°F)
- 1/4 tsp cream of tartar
- 3.5 oz sugar (I use C&H granulated sugar)
For the yolk mixture:
- 5 egg yolks
- 0.9 oz sugar
- 2 fl oz milk
- 1.7 fl oz oil (I prefer Wesson vegetable oil)
- 2 tsp vanilla (freshly stirred for best aroma)
- 1 pinch fine sea salt
For the dry ingredients:
- 3.5 oz flour (I always use King Arthur all-purpose flour)
- 1 tsp baking powder (sifted to remove lumps)
For the frosting and assembly:
- 16 oz heavy cream (chilled, high-fat content for better texture)
- 1.5 oz powdered sugar
- 1/2 tsp strawberry extract
- 8-10 fresh strawberries, diced
Step 1: Prepare Mise en Place and Preheat Oven
- parchment paper
- 3.5 oz flour
- 1 tsp baking powder
Preheat your oven to 350°F.
While it heats, line three 8-inch round cake pans with parchment paper, ensuring the paper covers the bottom completely.
Separate your eggs carefully, making sure no yolk gets into the whites—even a tiny amount of yolk will prevent the whites from whipping properly.
Measure out all your dry ingredients (flour and baking powder) and sift them together into a small bowl to remove any lumps; sifting aerates the flour and ensures even distribution of the baking powder.
Have your milk, oil, and vanilla measured and ready.
This preparation ensures everything moves smoothly once you begin mixing.
Step 2: Whip Egg Whites to Stiff Peaks
- 5 egg whites
- 1/4 tsp cream of tartar
- 3.5 oz sugar
In a large, completely clean and dry bowl, combine the 5 room-temperature egg whites with the cream of tartar.
Using an electric mixer on high speed, beat the whites until they become foamy and opaque, about 1-2 minutes.
Gradually add the 3.5 oz sugar in small increments while continuing to beat, allowing each addition to incorporate fully before adding more.
This slow addition of sugar stabilizes the foam and helps create glossy, stiff peaks.
Continue beating until the whites hold firm, shiny peaks that don’t collapse when you lift the beaters—this usually takes 4-6 minutes total.
I like to test the peaks by turning the bowl at an angle; if the whites don’t slide, they’re ready.
Step 3: Create the Egg Yolk Base
- 5 egg yolks
- 0.9 oz sugar
- 2 fl oz milk
- 1.7 fl oz oil
- 2 tsp vanilla
- dry ingredient mixture from Step 1
In a separate medium bowl, whisk together the 5 egg yolks with the 0.9 oz sugar until the mixture becomes pale yellow and slightly thickened, about 2-3 minutes of whisking.
Add the milk, oil, and vanilla, whisking until fully combined and smooth.
Pour the sifted dry ingredient mixture from Step 1 into the yolk mixture and fold or stir gently until no flour streaks remain and the batter is smooth.
The wet ingredients will hydrate the flour and create a light, smooth base for the chiffon cake.
Step 4: Fold Whites into Batter and Bake
- 1 pinch fine sea salt
- egg yolk batter from Step 3
- whipped egg whites from Step 2
Pour the yolk batter into the bowl with the whipped egg whites.
Using a spatula, gently fold the batter together by cutting down the middle, sweeping across the bottom, and folding up and over the top—rotate the bowl as you go.
Fold just until no white streaks remain; overfolding deflates the foam and creates a denser cake.
Divide the batter evenly among the three prepared pans.
Bake in your preheated 350°F oven for 23-25 minutes until a toothpick inserted in the center comes out clean and the tops are lightly golden.
Step 5: Cool Cakes Completely
Remove the baked cakes from the oven and immediately invert the pans onto a cooling rack or onto the rim of glasses positioned to support the sides (this keeps the cakes inverted).
Let them cool completely in this position for at least 30 minutes—this upside-down cooling prevents the delicate structure from collapsing under its own weight.
Once fully cooled, gently run a thin knife around the edges of each cake and remove them from the pans, carefully peeling away the parchment paper.
Step 6: Prepare Strawberry-Infused Whipped Cream
- 16 oz heavy cream
- 1.5 oz powdered sugar
- 1/2 tsp strawberry extract
- 8-10 fresh strawberries, diced
Pour the 16 oz chilled heavy cream into a clean, cold bowl.
Using an electric mixer on medium-high speed, begin whipping the cream.
When soft peaks start to form (about 1-2 minutes), add the powdered sugar and strawberry extract.
Continue whipping until medium-stiff peaks form—the cream should hold its shape but still be spreadable.
I prefer to stop just before stiff peaks to keep the cream smooth and prevent overwhipping into a grainy texture.
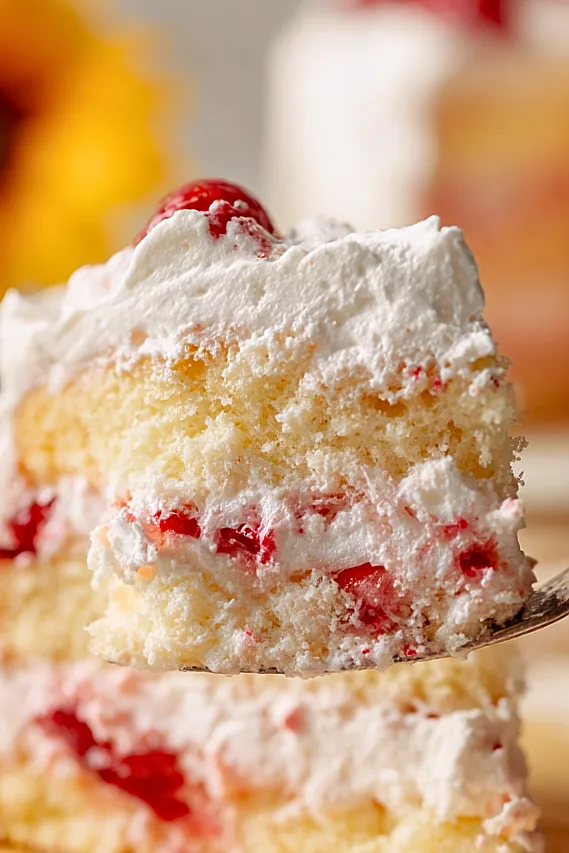
Gently fold in the diced fresh strawberries by hand so they’re evenly distributed without getting crushed.
Step 7: Layer, Crumb Coat, and Finish
- cooled cakes from Step 5
- strawberry-infused whipped cream from Step 6
Place the first cake layer on your serving plate.
Spread a generous layer of strawberry whipped cream from Step 6 on top, then add the second cake layer.
Repeat with another layer of cream and the third cake layer.
Apply a thin “crumb coat” layer of cream over the entire cake—this seals in any loose crumbs before the final frosting.
Refrigerate for 15 minutes to set this layer.
Apply the final, thicker layer of cream to the top and sides of the cake, creating an even, smooth finish.
Chill the finished cake for at least 1 hour before serving, which allows the cream to fully set and makes slicing cleaner.
Top with additional fresh strawberries just before serving for the best appearance.
Elegant Strawberry Chiffon Cake
Ingredients
Method
- Preheat your oven to 350°F. While it heats, line three 8-inch round cake pans with parchment paper, ensuring the paper covers the bottom completely. Separate your eggs carefully, making sure no yolk gets into the whites—even a tiny amount of yolk will prevent the whites from whipping properly. Measure out all your dry ingredients (flour and baking powder) and sift them together into a small bowl to remove any lumps; sifting aerates the flour and ensures even distribution of the baking powder. Have your milk, oil, and vanilla measured and ready. This preparation ensures everything moves smoothly once you begin mixing.
- In a large, completely clean and dry bowl, combine the 5 room-temperature egg whites with the cream of tartar. Using an electric mixer on high speed, beat the whites until they become foamy and opaque, about 1-2 minutes. Gradually add the 3.5 oz sugar in small increments while continuing to beat, allowing each addition to incorporate fully before adding more. This slow addition of sugar stabilizes the foam and helps create glossy, stiff peaks. Continue beating until the whites hold firm, shiny peaks that don't collapse when you lift the beaters—this usually takes 4-6 minutes total. I like to test the peaks by turning the bowl at an angle; if the whites don't slide, they're ready.
- In a separate medium bowl, whisk together the 5 egg yolks with the 0.9 oz sugar until the mixture becomes pale yellow and slightly thickened, about 2-3 minutes of whisking. Add the milk, oil, and vanilla, whisking until fully combined and smooth. Pour the sifted dry ingredient mixture from Step 1 into the yolk mixture and fold or stir gently until no flour streaks remain and the batter is smooth. The wet ingredients will hydrate the flour and create a light, smooth base for the chiffon cake.
- Pour the yolk batter into the bowl with the whipped egg whites. Using a spatula, gently fold the batter together by cutting down the middle, sweeping across the bottom, and folding up and over the top—rotate the bowl as you go. Fold just until no white streaks remain; overfolding deflates the foam and creates a denser cake. Divide the batter evenly among the three prepared pans. Bake in your preheated 350°F oven for 23-25 minutes until a toothpick inserted in the center comes out clean and the tops are lightly golden.
- Remove the baked cakes from the oven and immediately invert the pans onto a cooling rack or onto the rim of glasses positioned to support the sides (this keeps the cakes inverted). Let them cool completely in this position for at least 30 minutes—this upside-down cooling prevents the delicate structure from collapsing under its own weight. Once fully cooled, gently run a thin knife around the edges of each cake and remove them from the pans, carefully peeling away the parchment paper.
- Pour the 16 oz chilled heavy cream into a clean, cold bowl. Using an electric mixer on medium-high speed, begin whipping the cream. When soft peaks start to form (about 1-2 minutes), add the powdered sugar and strawberry extract. Continue whipping until medium-stiff peaks form—the cream should hold its shape but still be spreadable. I prefer to stop just before stiff peaks to keep the cream smooth and prevent overwhipping into a grainy texture. Gently fold in the diced fresh strawberries by hand so they're evenly distributed without getting crushed.
- Place the first cake layer on your serving plate. Spread a generous layer of strawberry whipped cream from Step 6 on top, then add the second cake layer. Repeat with another layer of cream and the third cake layer. Apply a thin "crumb coat" layer of cream over the entire cake—this seals in any loose crumbs before the final frosting. Refrigerate for 15 minutes to set this layer. Apply the final, thicker layer of cream to the top and sides of the cake, creating an even, smooth finish. Chill the finished cake for at least 1 hour before serving, which allows the cream to fully set and makes slicing cleaner. Top with additional fresh strawberries just before serving for the best appearance.