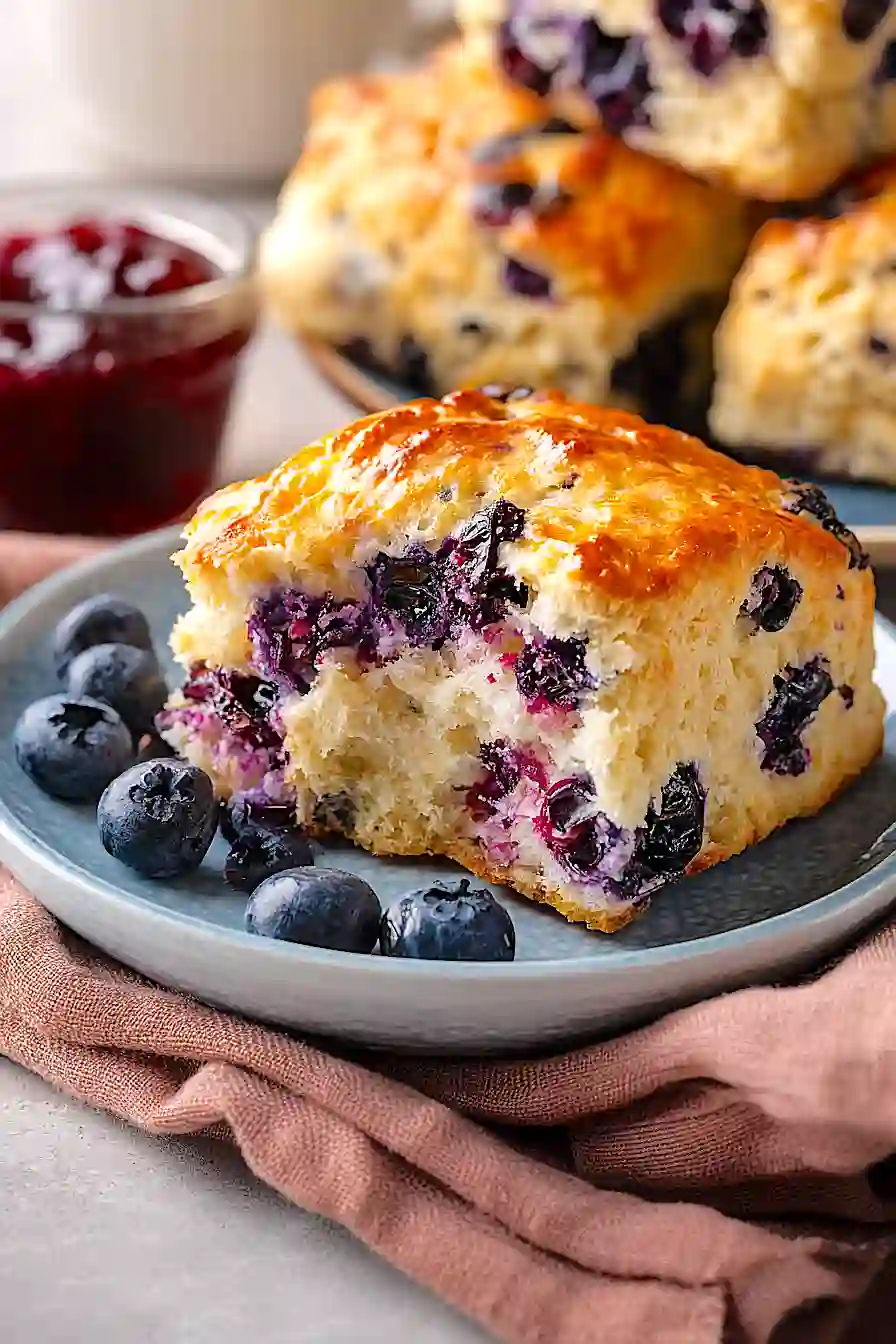
If you ask me, blueberry biscuits are one of the best ways to start your morning.
These flaky, buttery biscuits are packed with fresh blueberries and just a hint of lemon zest. The buttermilk keeps them tender while the berries add little bursts of sweetness in every bite.
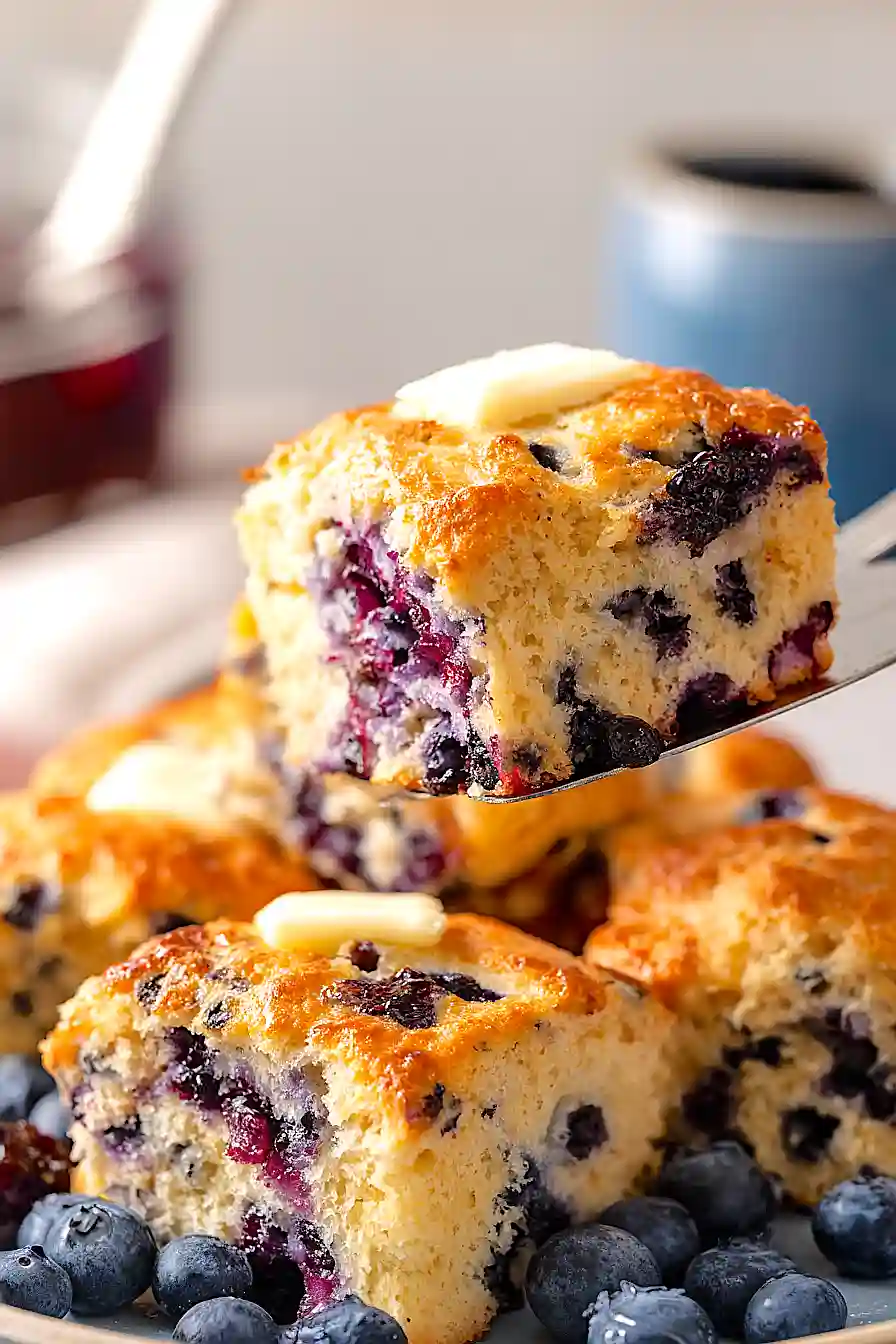
They come together with a quick brush of honey butter that gives them a golden finish. Cold butter and a gentle hand are all you need to get those layers just right.
They’re perfect for a weekend breakfast or brunch, and honestly, they’re good any time of day.
Why You’ll Love These Blueberry Biscuits
- Fresh blueberries in every bite – The juicy berries burst with flavor as they bake, creating sweet pockets throughout these tender biscuits.
- Simple ingredients – You probably have most of these pantry staples on hand already, making this an easy recipe to whip up whenever the craving hits.
- Perfect for breakfast or brunch – These biscuits work great for a weekend breakfast, special brunch gathering, or even as an afternoon snack with coffee.
- Honey butter topping – The sweet honey butter brushed on top adds an extra layer of flavor that takes these biscuits from good to amazing.
What Kind of Blueberries Should I Use?
Fresh blueberries are definitely the way to go for these biscuits, as they hold their shape better during baking and won’t add extra moisture to your dough. If you can find them, wild blueberries are smaller and pack a more intense flavor, but regular cultivated blueberries from the grocery store work perfectly fine too. Frozen blueberries can work in a pinch, but don’t thaw them first – toss them into the dough while they’re still frozen to prevent them from turning your biscuits purple and making the dough too wet. When shopping, look for firm berries without any mushy spots, and give them a gentle rinse and pat them completely dry before adding them to your flour mixture.
Options for Substitutions
These biscuits are pretty forgiving, so here are some swaps you can make if needed:
- Fresh blueberries: Frozen blueberries work great too – just don’t thaw them first. Toss them straight from the freezer into your dough to prevent them from bleeding too much color. You can also try raspberries or blackberries for a different berry flavor.
- Buttermilk: No buttermilk? Make your own by adding 1 ½ tablespoons of lemon juice or white vinegar to regular milk and letting it sit for 5 minutes. You can also use plain yogurt thinned with a bit of milk to reach the right consistency.
- All-purpose flour: While all-purpose flour is best for tender biscuits, you can use a mix of half all-purpose and half whole wheat flour for a heartier texture. Just know your biscuits will be a bit denser.
- Unsalted butter: If you only have salted butter, go ahead and use it but reduce the added salt by about half. The cold temperature is more important than whether it’s salted or not.
- Honey: Maple syrup or agave nectar can replace the honey in the butter topping without any issues.
Watch Out for These Mistakes While Baking
The biggest mistake when making biscuits is using warm butter, which will melt into the dough instead of creating those flaky layers you want – keep your butter in the fridge until the last minute and work quickly so it stays cold.
Overmixing the dough after adding the buttermilk is another common error that leads to tough, dense biscuits, so stir just until the ingredients come together and don’t worry if the dough looks a bit shaggy.
Fresh blueberries can sometimes burst and turn your biscuits purple, so if you want to avoid this, freeze them for 15 minutes before folding them in, which helps them hold their shape during baking.
Finally, resist the urge to open the oven door during the first 30 minutes of baking, as the temperature drop can prevent your biscuits from rising properly and getting that golden top.

What to Serve With Blueberry Biscuits?
These blueberry biscuits are perfect for breakfast or brunch alongside scrambled eggs, crispy bacon, and fresh fruit like sliced strawberries or melon. I love serving them warm with extra butter and honey drizzled on top, or you can go the sweeter route with a dollop of whipped cream or vanilla yogurt. They also make a great afternoon snack with a hot cup of coffee or tea, especially when you split them open and add a smear of cream cheese. If you’re feeding a crowd for brunch, set out a little spread with different jams, lemon curd, or even mascarpone cheese so everyone can customize their biscuit however they like.
Storage Instructions
Store: Keep your blueberry biscuits in an airtight container at room temperature for up to 2 days, or in the fridge for up to 5 days. The blueberries make them a bit more moist than regular biscuits, so refrigerating helps them last longer without getting soggy.
Freeze: These biscuits freeze really well for up to 3 months. Let them cool completely, then wrap each one individually in plastic wrap before placing them all in a freezer bag. This way you can grab just one or two whenever you want a quick breakfast or snack.
Warm Up: To bring your biscuits back to life, wrap them in foil and warm in a 350°F oven for about 10 minutes if refrigerated, or 15-20 minutes if frozen. You can also microwave them for 20-30 seconds, but the oven gives you that nice crispy outside again.
| Preparation Time | 20-30 minutes |
| Cooking Time | 40-45 minutes |
| Total Time | 75-85 minutes |
| Level of Difficulty | Medium |
| Servings | 9 biscuits |
Estimated Nutrition
Estimated nutrition for the whole recipe (without optional ingredients):
- Calories: 2850-3050
- Protein: 35-40 g
- Fat: 135-145 g
- Carbohydrates: 370-390 g
Ingredients
For the dough:
- 11 tablespoons unsalted butter (chilled and cut into 1/2-inch cubes)
- 3 cups all-purpose flour
- 1/2 cup granulated sugar
- 2 1/4 teaspoons baking powder
- 1/2 teaspoon baking soda
- 1 1/2 teaspoons salt
- 1 1/2 cups fresh blueberries (rinsed and dried)
- 1 2/3 cups cold buttermilk
- 1 teaspoon freshly grated lemon zest
For the honey butter:
- 2 1/2 tablespoons butter (melted)
- 1 1/2 tablespoons honey
- 1 pinch salt
- 1/4 teaspoon vanilla extract
Step 1: Prepare Pan and Preheat Oven
- 1 tablespoon butter
- 9×13 inch baking pan
Preheat your oven to 400°F.
While it heats, melt 1 tablespoon of butter in a 9×13 inch baking pan (or similar size), tilting to coat the bottom and sides evenly.
This prevents sticking and adds flavor to the biscuit edges.
Set the prepared pan aside.
Step 2: Make Dry Mixture and Cut in Cold Butter
- 3 cups all-purpose flour
- 1/2 cup granulated sugar
- 2 1/4 teaspoons baking powder
- 1/2 teaspoon baking soda
- 1 1/2 teaspoons salt
- 11 tablespoons unsalted butter
In a large bowl, whisk together flour, sugar, baking powder, baking soda, and salt.
Working quickly to keep everything cold, add the chilled butter cubes and use a pastry cutter, two knives, or your fingertips to break the butter into the flour until the mixture resembles coarse breadcrumbs with some pea-sized pieces of butter still visible.
This creates pockets of steam that make biscuits fluffy and tender.
Step 3: Fold in Blueberries and Form Dough
- dry ingredient mixture from Step 2
- 1 1/2 cups fresh blueberries
- 1 teaspoon freshly grated lemon zest
- 1 2/3 cups cold buttermilk
Gently stir the rinsed and dried blueberries and lemon zest into the dry mixture from Step 2, being careful not to crush the berries.
Pour in the cold buttermilk and fold everything together with a spatula until just combined—the dough should be slightly shaggy and wet.
I like to fold gently and quickly rather than mixing, which keeps the biscuits tender and prevents tough, dense crumbs.
Step 4: Spread and Score Dough
- dough from Step 3
- prepared pan from Step 1
Transfer the dough from Step 3 into the prepared pan from Step 1, spreading it gently and evenly into the bottom.
Using a sharp knife, score the dough into 9 equal squares (3 rows by 3 columns), cutting about halfway through the thickness.
This helps the biscuits bake evenly and makes them easy to separate after baking.
Step 5: Bake Until Golden
- pan with dough from Step 4
Place the pan in the preheated 400°F oven and bake for 40-45 minutes, until the top is golden brown and a toothpick inserted into a biscuit comes out clean.
The biscuits should spring back when lightly touched.
While baking, prepare the honey butter glaze in the next step.
Step 6: Make Honey Butter Glaze
- 2 1/2 tablespoons butter
- 1 1/2 tablespoons honey
- 1 pinch salt
- 1/4 teaspoon vanilla extract
While the biscuits bake, combine melted butter, honey, a pinch of salt, and vanilla extract in a small bowl or measuring cup, stirring until well combined.
The glaze will be thin and pourable.
I find that mixing these together while still warm helps the honey incorporate smoothly without clumping.
Step 7: Finish and Serve
- baked biscuits from Step 5
- honey butter glaze from Step 6
Remove the biscuits from the oven and let them cool in the pan for 5 minutes.
Carefully turn the pan upside down onto a wire rack or cutting board to release the biscuits in one piece, then separate them along the scored lines.
Brush the warm biscuits generously with the honey butter glaze from Step 6, coating all sides.
Let cool for 10 minutes before serving—this allows the glaze to set slightly while keeping the biscuits warm.
Tasty Blueberry Biscuits
Ingredients
Method
- Preheat your oven to 400°F. While it heats, melt 1 tablespoon of butter in a 9x13 inch baking pan (or similar size), tilting to coat the bottom and sides evenly. This prevents sticking and adds flavor to the biscuit edges. Set the prepared pan aside.
- In a large bowl, whisk together flour, sugar, baking powder, baking soda, and salt. Working quickly to keep everything cold, add the chilled butter cubes and use a pastry cutter, two knives, or your fingertips to break the butter into the flour until the mixture resembles coarse breadcrumbs with some pea-sized pieces of butter still visible. This creates pockets of steam that make biscuits fluffy and tender.
- Gently stir the rinsed and dried blueberries and lemon zest into the dry mixture from Step 2, being careful not to crush the berries. Pour in the cold buttermilk and fold everything together with a spatula until just combined—the dough should be slightly shaggy and wet. I like to fold gently and quickly rather than mixing, which keeps the biscuits tender and prevents tough, dense crumbs.
- Transfer the dough from Step 3 into the prepared pan from Step 1, spreading it gently and evenly into the bottom. Using a sharp knife, score the dough into 9 equal squares (3 rows by 3 columns), cutting about halfway through the thickness. This helps the biscuits bake evenly and makes them easy to separate after baking.
- Place the pan in the preheated 400°F oven and bake for 40-45 minutes, until the top is golden brown and a toothpick inserted into a biscuit comes out clean. The biscuits should spring back when lightly touched. While baking, prepare the honey butter glaze in the next step.
- While the biscuits bake, combine melted butter, honey, a pinch of salt, and vanilla extract in a small bowl or measuring cup, stirring until well combined. The glaze will be thin and pourable. I find that mixing these together while still warm helps the honey incorporate smoothly without clumping.
- Remove the biscuits from the oven and let them cool in the pan for 5 minutes. Carefully turn the pan upside down onto a wire rack or cutting board to release the biscuits in one piece, then separate them along the scored lines. Brush the warm biscuits generously with the honey butter glaze from Step 6, coating all sides. Let cool for 10 minutes before serving—this allows the glaze to set slightly while keeping the biscuits warm.