Monday meal prep has a way of exposing your weaknesses. You stand in front of the fridge, open three containers of last week’s leftovers, and think: oh. We’re back to dry chicken and sad rice again. Cool cool cool
So I built these cottage cheese taco bowls because I needed something that still tasted like a REAL lunch by Wednesday. Not “fine for a meal prep” lunch. An actual crave-it-at-11am, kinda craving lunch
Creamy cottage cheese on the bottom (Good Culture, the thick tubs), seasoned beef, fresh pico with a serious amount of jalapeño, shredded cheddar, and an avocado I slice right on top so it doesn’t go brown and sad by day three. Protein packed. Filling. Honestly gets better as it sits
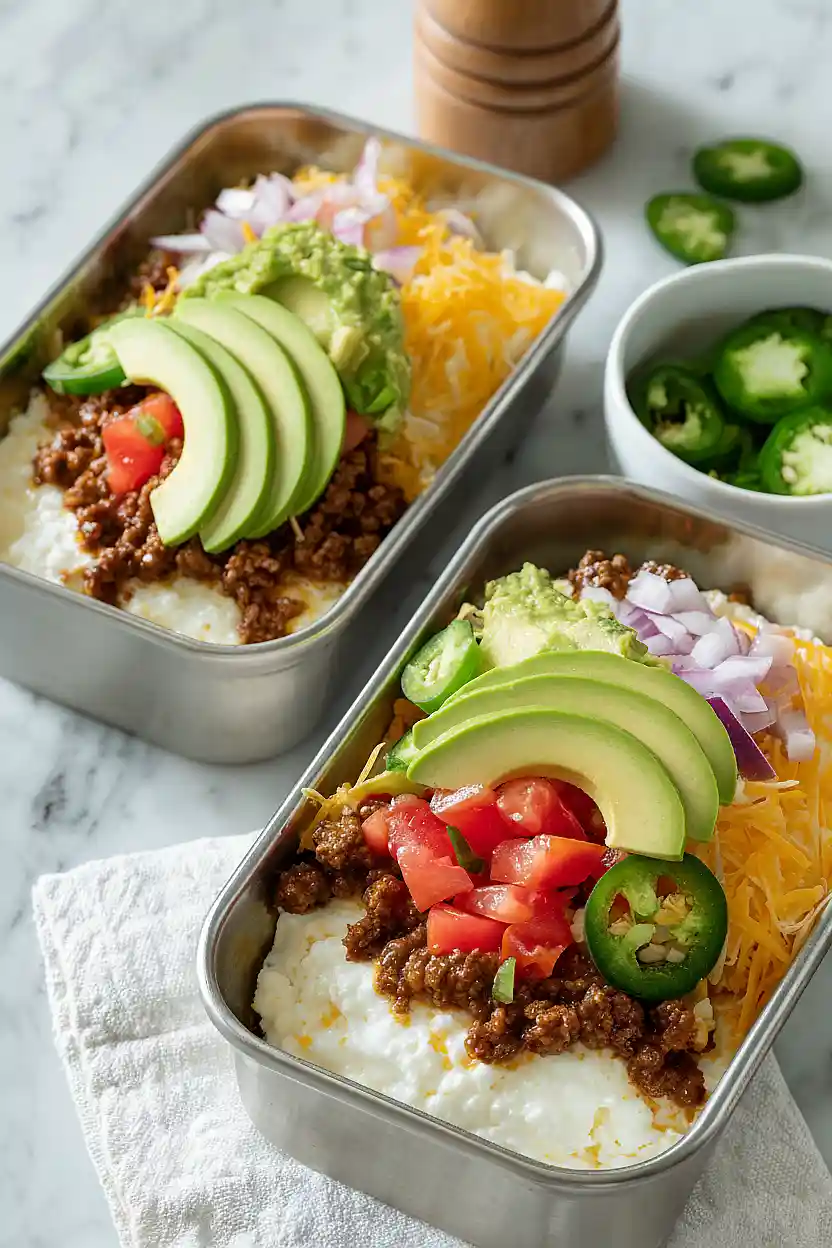
Why Cottage Cheese Works as a Base
Cottage cheese brings HIGH PROTEIN (around 25g per cup!) with minimal fat, making it a SMART base that won’t weigh you down. Good Culture specifically works because it’s THICKER, staying intact for days instead of breaking into watery mush.
The curds actually soak up pico juices without going soggy (!), and the mild flavor won’t compete with the taco seasoning.
How to Keep Avocado Fresh All Week
- Buy slightly underripe. Ripen on the counter, then refrigerate WHOLE fruit to extend life 3-5 days.
- Cut only at serving time (oxidization hits within HOURS of slicing).
- Brush exposed flesh with fresh lime juice from your pico. Acidity blocks browning.
- Press plastic wrap DIRECTLY onto cut surfaces, no air gaps allowed.
- Store wrapped halves in the coldest fridge spot. Back shelf wins every time.
Meal Prep Storage & Reheating Tips
- Store bowls in airtight containers for up to 4 days…. avocado stays separate (wrapped tight, no air!)
- Reheat in microwave for 90 seconds, stirring halfway through… or eat cold if you’re into that cottage cheese straight-from-the-fridge life??
- Keep pico on top if you want texture… mix it in BEFORE reheating if you want warm, melty everything
- NEVER freeze the cottage cheese base (it gets grainy and sad)… beef and pico freeze fine for 2 months
- Add fresh cilantro or a squeeze of lime after reheating to wake everything back up!
Make It Spicier (or Milder)
- UP THE HEAT by swapping jalapeños for serranos (2-3x spicier, so use half the amount)
- LEAVE the jalapeño seeds and ribs IN for instant kick without buying anything new
- STIR 1/4 tsp cayenne or chipotle powder into the beef for smoky heat
- DRIZZLE Cholula or Valentina on top right before eating (adds vinegar tang too)
- SWAP cheddar for pepper jack cheese (melts the same, brings built-in spice)
- TAME IT DOWN by replacing jalapeños with diced bell peppers entirely
- STRIP every seed and white rib from the jalapeños before dicing
- GRAB mild taco seasoning and skip any cayenne additions
- STICK with plain Monterey Jack if pepper jack feels too aggressive
The beauty of taco bowls is they’re YOURS to customize. Start low with the peppers, taste the pico, and adjust from there. Heat is personal…. respect your tongue!
Related Recipes
- High Protein Cottage Cheese Chicken Taco Bowl
- Sweet Potato and Cottage Cheese Taco Bowl
- Quick Southwest Salad
- Mouthwatering Greek Salad Cottage Cheese Bowl
- Tacos al Pastor
- Cowboy Pasta Salad
Estimated Nutrition
Estimated nutrition for the whole recipe (without optional ingredients):
- Calories: 1350-1500
- Protein: 105-120 g
- Fat: 75-85 g
- Carbohydrates: 55-65 g
Ingredients
For the beef:
- 0.75 lb ground beef (I prefer Laura’s Lean for a cleaner protein base)
- 2.5 tbsp taco seasoning
For the pico de gallo:
- 4 tomatoes (seeded and diced into 1/4-inch pieces)
- 1 onion
- 3 jalapeños
- 1 lime
- 1/4 tsp salt
- 1/8 tsp pepper
- 2 tbsp fresh cilantro, chopped
For the bowl assembly:
- 3.5 cups cottage cheese (I always use Good Culture for a thicker, creamier texture)
- 0.5 cup cheddar cheese (finely shredded for even melting)
- 1 avocado
Step 1: Mix the Pico de Gallo
- 4 tomatoes, seeded and diced
- 1 onion, finely diced
- 3 jalapeños, finely diced
- 1 lime, juiced
- 1/4 tsp salt
- 1/8 tsp pepper
- 2 tbsp fresh cilantro, chopped
While you’re gathering your ingredients, prepare the pico de gallo first since it benefits from sitting for a few minutes to allow flavors to meld.
Dice the tomatoes into 1/4-inch pieces after seeding them to remove excess moisture—this prevents your bowls from getting watery during storage.
Finely dice the onion and jalapeños (remove seeds if you prefer less heat), then combine everything in a bowl with the lime juice, salt, pepper, and fresh cilantro.
Set aside to let the flavors develop while you cook the beef.
Step 2: Brown the Taco Meat
- 0.75 lb ground beef
- 2.5 tbsp taco seasoning
Heat a large skillet over medium-high heat and add the ground beef, breaking it up with a wooden spoon as it cooks.
Cook for 5-7 minutes until the beef is fully browned and no pink remains.
I like to use Laura’s Lean because it has a cleaner protein profile and less grease to drain off.
Add the taco seasoning and 2-3 tablespoons of water, stirring well to coat the beef evenly.
Simmer for 1-2 minutes until the seasoning is fully incorporated, then remove from heat and let cool slightly.
Step 3: Layer Beef and Cottage Cheese
- 3.5 cups cottage cheese
- cooked seasoned beef from Step 2
Divide the cottage cheese evenly among 3 meal prep containers or bowls, using about 1.25 cups per bowl as your creamy base.
I always choose Good Culture brand because the thicker, creamier texture holds up better during the week compared to thinner varieties.
Top each bowl with an equal portion of the cooked seasoned beef from Step 2, spreading it across the cottage cheese layer.
Step 4: Garnish with Cheese and Salsa
- 0.5 cup cheddar cheese, finely shredded
- fresh pico de gallo from Step 1
Sprinkle the finely shredded cheddar cheese evenly over the beef in each bowl—about 2.5-3 tablespoons per bowl.
The finely shredded cheese distributes more evenly across the components and melts slightly when you heat the bowls.
Now add the fresh pico de gallo from Step 1, dividing it equally among the three bowls.
Gently stir everything together to combine all the flavors, being careful not to break up the cottage cheese too much.
Step 5: Top with Fresh Avocado
- 1 avocado
Cover your assembled bowls and refrigerate for meal prep storage.
When you’re ready to eat each bowl, slice the avocado and add your portion on top just before eating—this prevents browning and keeps the avocado fresh and creamy throughout the week.
You can store the uncut avocado separately wrapped in plastic wrap for up to 4 days.

Quick Meal Prep Cottage Cheese Taco Bowls
Ingredients
Method
- While you're gathering your ingredients, prepare the pico de gallo first since it benefits from sitting for a few minutes to allow flavors to meld. Dice the tomatoes into 1/4-inch pieces after seeding them to remove excess moisture—this prevents your bowls from getting watery during storage. Finely dice the onion and jalapeños (remove seeds if you prefer less heat), then combine everything in a bowl with the lime juice, salt, pepper, and fresh cilantro. Set aside to let the flavors develop while you cook the beef.
- Heat a large skillet over medium-high heat and add the ground beef, breaking it up with a wooden spoon as it cooks. Cook for 5-7 minutes until the beef is fully browned and no pink remains. I like to use Laura's Lean because it has a cleaner protein profile and less grease to drain off. Add the taco seasoning and 2-3 tablespoons of water, stirring well to coat the beef evenly. Simmer for 1-2 minutes until the seasoning is fully incorporated, then remove from heat and let cool slightly.
- Divide the cottage cheese evenly among 3 meal prep containers or bowls, using about 1.25 cups per bowl as your creamy base. I always choose Good Culture brand because the thicker, creamier texture holds up better during the week compared to thinner varieties. Top each bowl with an equal portion of the cooked seasoned beef from Step 2, spreading it across the cottage cheese layer.
- Sprinkle the finely shredded cheddar cheese evenly over the beef in each bowl—about 2.5-3 tablespoons per bowl. The finely shredded cheese distributes more evenly across the components and melts slightly when you heat the bowls. Now add the fresh pico de gallo from Step 1, dividing it equally among the three bowls. Gently stir everything together to combine all the flavors, being careful not to break up the cottage cheese too much.
- Cover your assembled bowls and refrigerate for meal prep storage. When you're ready to eat each bowl, slice the avocado and add your portion on top just before eating—this prevents browning and keeps the avocado fresh and creamy throughout the week. You can store the uncut avocado separately wrapped in plastic wrap for up to 4 days.