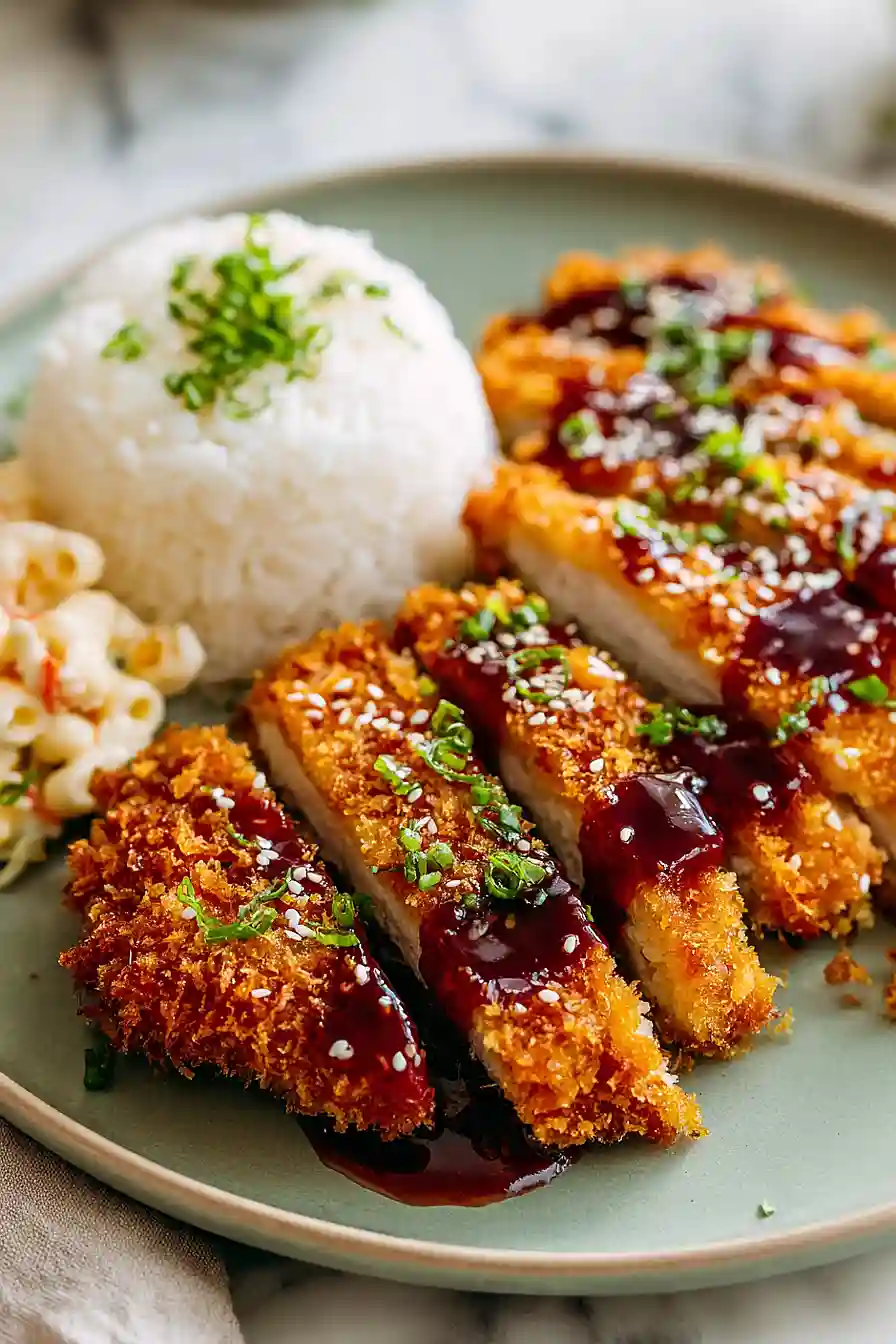
I’ve always loved chicken katsu, but let me tell you, the Hawaiian version takes it to a whole new level. The secret is in the furikake mixed right into the panko coating – it adds this savory, slightly salty flavor that’s just perfect. Plus, making it at home means you can control how crispy you want that coating and how spicy you want the sauce.
This dish might look like it takes some work, but it’s actually pretty straightforward. You’re basically just setting up a breading station and frying until golden. The homemade katsu sauce comes together in minutes, and it’s so much better than anything from a bottle. I like to serve mine over rice with some kimchi on the side for a little tang.
Whether you’re craving a taste of the islands or just want to try something different for dinner tonight, this Hawaiian chicken katsu delivers. Crispy, juicy, and packed with flavor – that’s what we’re talking about.

Why You’ll Love This Hawaiian Chicken Katsu
- Crispy, golden perfection – The panko and furikake coating creates an incredibly crunchy exterior that stays crispy, while the chicken inside remains juicy and tender.
- Restaurant-quality at home – You can make this popular Hawaiian plate lunch favorite in your own kitchen for a fraction of the cost, and it tastes just as good as what you’d get at a local spot.
- Quick weeknight dinner – Ready in under an hour, this recipe is perfect for busy evenings when you want something special without spending all night in the kitchen.
- Flavorful homemade sauce – The sweet and tangy katsu sauce comes together in minutes with ingredients you probably already have, making it so much better than store-bought.
- Fun to make – The breading process is straightforward and satisfying, and watching the chicken turn golden brown in the pan is always rewarding.
What Kind of Chicken Should I Use?
For chicken katsu, you’ll want to stick with boneless, skinless chicken breasts since they’re easy to pound thin and cook evenly. If your chicken breasts are on the thicker side, don’t hesitate to slice them in half horizontally to create thinner cutlets – this helps them cook faster and stay juicy. You can also use chicken thighs if that’s what you have on hand, though you’ll want to remove the skin and bones first. The key is getting your chicken to about ½-inch thickness so it fries up crispy on the outside while staying tender inside.
Options for Substitutions
This recipe is pretty adaptable, so here are some swaps you can make if needed:
- Chicken breasts: Chicken thighs work great here and actually stay a bit juicier. You can also use pork chops for a different take on katsu – just pound them to an even thickness before breading.
- Panko breadcrumbs: Regular breadcrumbs can work in a pinch, but panko really is what gives katsu that signature crispy texture. If you only have regular breadcrumbs, the coating will be crunchier but less airy.
- Furikake: If you can’t find furikake, you can skip it or make a simple substitute by mixing together sesame seeds, a bit of crumbled nori (seaweed), and a pinch of salt. It won’t be exactly the same, but it’ll add some nice flavor.
- Hot sauce: Any hot sauce works here – sriracha, tabasco, or even sambal oelek. Adjust the amount based on how spicy you like things, or leave it out entirely for a milder version.
- Canola or vegetable oil: You can use peanut oil or any neutral oil with a high smoke point for frying. Avoid olive oil as it can’t handle the high heat needed for proper frying.
- White rice: Brown rice, jasmine rice, or even cauliflower rice all work as sides, though white rice is traditional for this dish.
Watch Out for These Mistakes While Cooking
The biggest mistake when making chicken katsu is not pounding the chicken breasts to an even thickness – uneven pieces will cook at different rates, leaving you with dry edges and undercooked centers, so aim for about ½-inch thickness throughout.
Another common error is letting your oil temperature drop too low once you add the chicken, which creates greasy, soggy breading instead of a crispy golden crust – use a thermometer to maintain 350°F and avoid overcrowding the pan.
Don’t skip the resting step after frying; let the chicken sit on a wire rack for a few minutes rather than paper towels, which trap steam underneath and make the bottom coating lose its crunch.
Finally, resist the urge to press down on the chicken while it’s frying, as this squeezes out moisture and compacts the panko, preventing that light and airy texture you’re looking for.
What to Serve With Chicken Katsu?
Chicken katsu is all about that crispy, crunchy coating, so I love pairing it with simple sides that won’t compete with the main event. A bowl of steamed white rice is pretty much essential – it soaks up that tangy katsu sauce and balances out the richness of the fried chicken. I usually add a quick cabbage slaw on the side, either dressed with a light sesame vinaigrette or just shredded plain, which adds a fresh, crispy contrast to the dish. For a more filling meal, try serving it with some miso soup or a simple cucumber salad with rice vinegar, and don’t forget extra katsu sauce for dipping!
Storage Instructions
Store: Keep your leftover chicken katsu in an airtight container in the fridge for up to 3 days. The breading won’t be quite as crispy as when it’s fresh, but it still tastes great. Store the sauce separately in a small jar or container so it doesn’t make the chicken soggy.
Freeze: You can freeze the breaded chicken katsu for up to 2 months, either before or after frying. If freezing uncooked, place them on a baking sheet until solid, then transfer to a freezer bag. Cooked katsu can be frozen the same way, just make sure it’s completely cooled first.
Reheat: The best way to bring back that crispy coating is in the oven or air fryer. Heat it at 375°F for about 10 minutes until warmed through and crispy again. You can also use the microwave in a pinch, but the breading will be softer.
| Preparation Time | 20-30 minutes |
| Cooking Time | 20-30 minutes |
| Total Time | 40-60 minutes |
| Level of Difficulty | Medium |
| Servings | 4 servings |
Estimated Nutrition
Estimated nutrition for the whole recipe (without optional ingredients):
- Calories: 1700-1900
- Protein: 90-110 g
- Fat: 50-60 g
- Carbohydrates: 210-230 g
Ingredients
For the chicken:
- 2 lb chicken breasts (halved lengthwise and pounded to 1/2-inch thickness)
- 1 cup all-purpose flour
- 1 1/2 tsp garlic powder
- 1 1/4 tsp salt
- 1/2 tsp black pepper
- 3 eggs (beaten until no streaks remain)
- 3 tbsp soy sauce
- 1 tsp toasted sesame oil
- 1 dash hot sauce
- 2 1/4 cups panko breadcrumbs
- 1/2 cup furikake
- 1 1/2 cups canola oil for frying
For the katsu sauce:
- 1/4 cup ketchup
- 1 tbsp worcestershire sauce
- 1 1/2 tbsp brown sugar
- 2 tsp sriracha
- 1/4 tsp ground ginger
For serving:
- 3 cups steamed Calrose rice
- 1 bunch chives, finely chopped
- 1/2 cup kimchi
Step 1: Prepare the Chicken and Set Up Breading Stations
- 2 lb chicken breasts
- 1 cup all-purpose flour
- 1 1/2 tsp garlic powder
- 1 1/4 tsp salt
- 1/2 tsp black pepper
- 3 eggs
- 3 tbsp soy sauce
- 1 tsp toasted sesame oil
- 1 dash hot sauce
- 2 1/4 cups panko breadcrumbs
- 1/2 cup furikake
Pat the chicken breasts dry with paper towels, then slice each one in half lengthwise to create thinner pieces.
Place each piece between plastic wrap and pound to an even 1/2-inch thickness using a meat mallet—this ensures even cooking and a tender result.
Set up three shallow bowls for breading: in the first bowl, whisk together flour, garlic powder, salt, and black pepper; in the second bowl, combine beaten eggs, soy sauce, toasted sesame oil, and hot sauce until well blended; in the third bowl, mix panko breadcrumbs with furikake until evenly distributed.
Arrange these bowls in a line for efficient assembly-line breading.
Step 2: Bread the Chicken
- breaded chicken pieces from Step 1
Working with one piece at a time, coat the chicken thoroughly in the flour mixture, shaking off excess.
Dip it into the egg mixture, letting excess drip off, then press it into the panko-furikake mixture, coating both sides evenly and pressing gently so the coating adheres.
Place breaded chicken on a clean plate or parchment paper.
I like to let the breaded chicken sit for 5-10 minutes before frying—this helps the coating stick better and creates a crispier crust.
Step 3: Make the Hawaiian Sauce
- 1/4 cup ketchup
- 1 tbsp worcestershire sauce
- 1 1/2 tbsp brown sugar
- 2 tsp sriracha
- 1/4 tsp ground ginger
While the chicken rests, combine ketchup, worcestershire sauce, brown sugar, sriracha, and ground ginger in a small bowl, stirring until the brown sugar dissolves completely and the sauce is smooth.
Taste and adjust seasonings if needed—the sauce should balance sweet, savory, and a touch of heat.
Set aside until ready to serve.
Step 4: Fry the Chicken Katsu
- 1 1/2 cups canola oil for frying
- breaded chicken from Step 2
Heat canola oil to 350°F in a large skillet over medium-high heat.
Once the oil reaches temperature, carefully place breaded chicken pieces into the hot oil, working in batches to avoid overcrowding the pan.
Fry for 4-5 minutes on the first side until golden brown, then flip and fry for another 4-5 minutes until the second side is equally golden and the internal temperature reaches 165°F.
Transfer cooked chicken to a paper towel-lined plate to drain excess oil.
Step 5: Assemble and Serve
- fried chicken from Step 4
- 3 cups steamed Calrose rice
- Hawaiian sauce from Step 3
- 1 bunch chives, finely chopped
- 1/2 cup kimchi
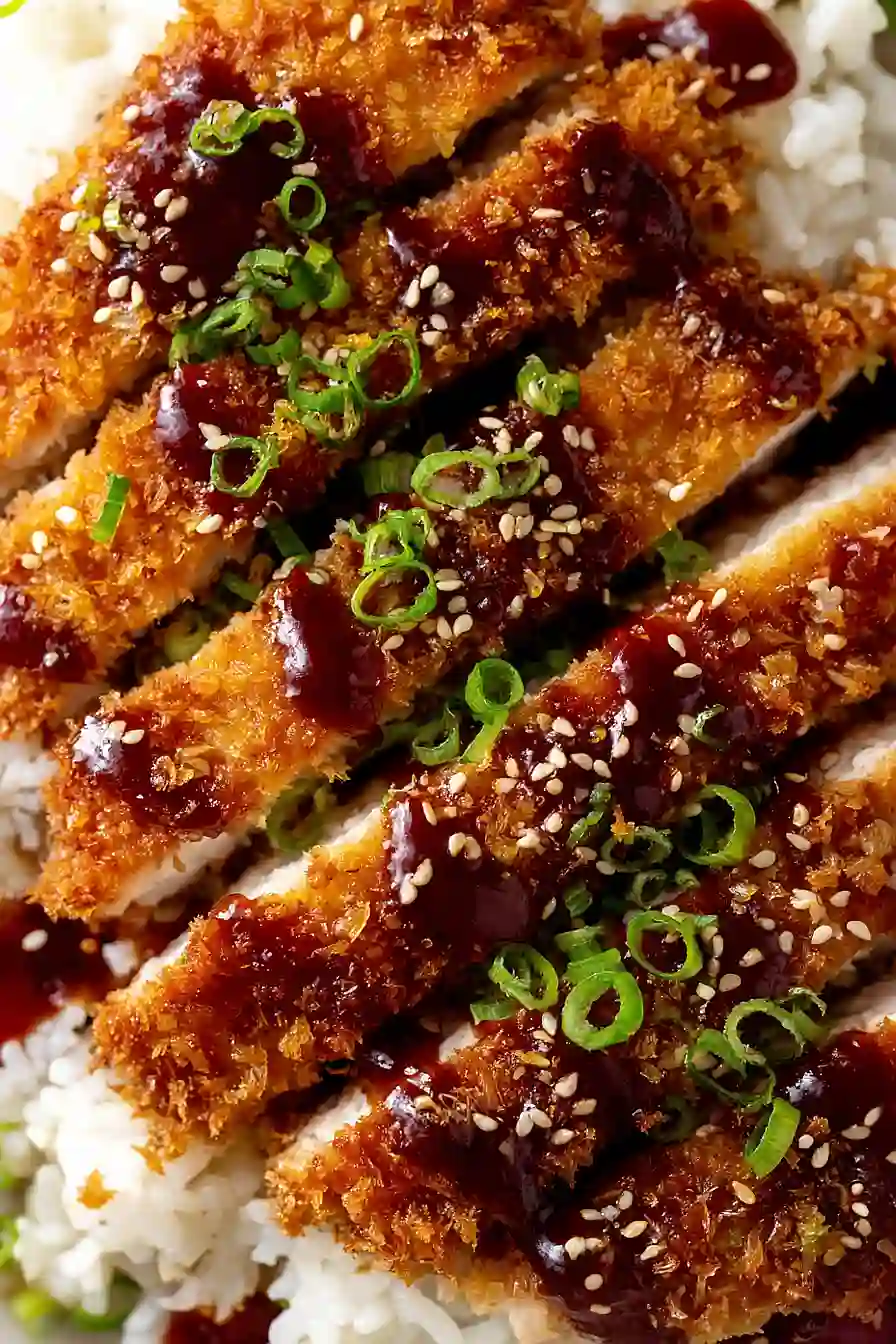
Slice the fried chicken into strips.
Divide steamed rice among serving plates and top with chicken strips.
Drizzle the Hawaiian sauce from Step 3 over the chicken, then sprinkle with chopped chives.
Serve with kimchi on the side for a bright, tangy contrast to the rich, crispy katsu.
I find that a generous dollop of kimchi on each bite cuts through the fried richness perfectly.
Juicy Hawaiian Chicken Katsu
Ingredients
Method
- Pat the chicken breasts dry with paper towels, then slice each one in half lengthwise to create thinner pieces. Place each piece between plastic wrap and pound to an even 1/2-inch thickness using a meat mallet—this ensures even cooking and a tender result. Set up three shallow bowls for breading: in the first bowl, whisk together flour, garlic powder, salt, and black pepper; in the second bowl, combine beaten eggs, soy sauce, toasted sesame oil, and hot sauce until well blended; in the third bowl, mix panko breadcrumbs with furikake until evenly distributed. Arrange these bowls in a line for efficient assembly-line breading.
- Working with one piece at a time, coat the chicken thoroughly in the flour mixture, shaking off excess. Dip it into the egg mixture, letting excess drip off, then press it into the panko-furikake mixture, coating both sides evenly and pressing gently so the coating adheres. Place breaded chicken on a clean plate or parchment paper. I like to let the breaded chicken sit for 5-10 minutes before frying—this helps the coating stick better and creates a crispier crust.
- While the chicken rests, combine ketchup, worcestershire sauce, brown sugar, sriracha, and ground ginger in a small bowl, stirring until the brown sugar dissolves completely and the sauce is smooth. Taste and adjust seasonings if needed—the sauce should balance sweet, savory, and a touch of heat. Set aside until ready to serve.
- Heat canola oil to 350°F in a large skillet over medium-high heat. Once the oil reaches temperature, carefully place breaded chicken pieces into the hot oil, working in batches to avoid overcrowding the pan. Fry for 4-5 minutes on the first side until golden brown, then flip and fry for another 4-5 minutes until the second side is equally golden and the internal temperature reaches 165°F. Transfer cooked chicken to a paper towel-lined plate to drain excess oil.
- Slice the fried chicken into strips. Divide steamed rice among serving plates and top with chicken strips. Drizzle the Hawaiian sauce from Step 3 over the chicken, then sprinkle with chopped chives. Serve with kimchi on the side for a bright, tangy contrast to the rich, crispy katsu. I find that a generous dollop of kimchi on each bite cuts through the fried richness perfectly.