I’ll be honest—I used to think crinkle cookies were some kind of fancy bakery secret that regular people like me couldn’t pull off at home. You know, one of those things that looks too pretty to be simple. Turns out, I was completely wrong.
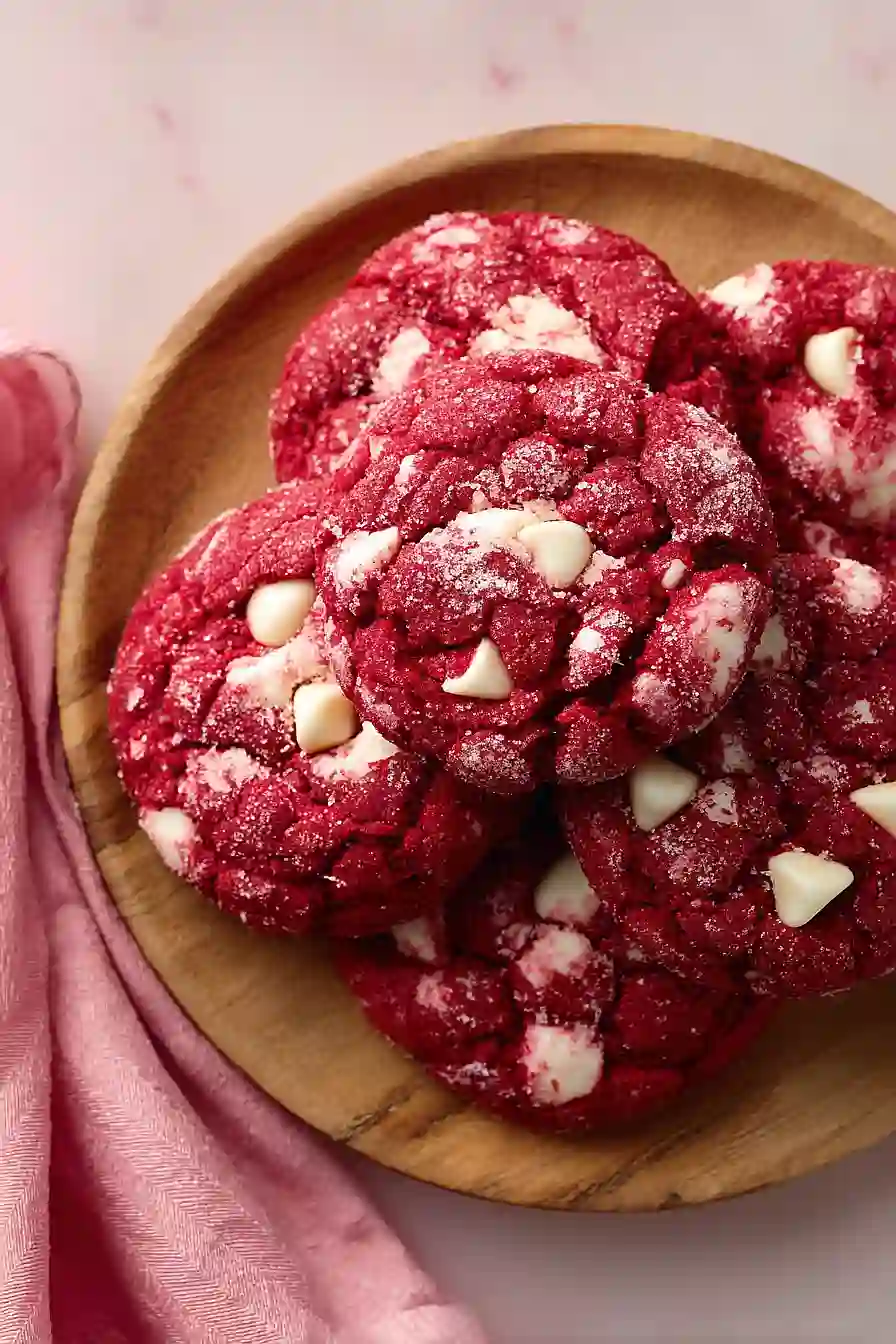
These red velvet white chocolate crinkle cookies use a cake mix as their base, which means you’re basically already halfway done before you even start. No creaming butter and sugar for ten minutes, no sifting a million different dry ingredients. Just mix, scoop, roll in powdered sugar, and bake. The crackly coating happens on its own in the oven—that’s just what the dough does when it bakes. And that pop of white chocolate against the red? It happens without you having to do anything special. Sometimes the best-looking cookies are actually the easiest ones to make.
Why You’ll Love These Red Velvet White Chocolate Crinkle Cookies
- Quick and easy – These cookies come together in under an hour using a cake mix shortcut, so you can have fresh-baked treats without spending all day in the kitchen.
- Simple ingredients – With just a box of cake mix and a few pantry staples, you probably already have everything you need to make these.
- Beautiful presentation – The red and white crinkle pattern makes these cookies look bakery-worthy, perfect for holiday parties or gift-giving without any fancy decorating skills required.
- Sweet white chocolate twist – The white chocolate chips add pockets of creamy sweetness that pair perfectly with the cocoa-rich red velvet base.
What Kind of Cake Mix Should I Use?
Any brand of red velvet cake mix will work great for these cookies, though I used Duncan Hines for this recipe. Most grocery stores carry at least one or two brands, and they all come in that standard 15-18 ounce box size. If your box is slightly smaller or larger than 18.25 ounces, don’t stress about it – a little difference won’t hurt the final result. Some bakers prefer certain brands because they find them more chocolatey or moist, but honestly, the cake mix is just your base here and the other ingredients will do most of the heavy lifting for flavor and texture.

Options for Substitutions
These cookies are pretty forgiving, so here are some swaps you can make if needed:
- Red velvet cake mix: This is the base of the recipe, so you’ll want to stick with red velvet cake mix to get that classic flavor and color. Different brands work fine – Betty Crocker, Pillsbury, or store brands all do the job.
- Butter: You can use vegetable oil instead of melted butter if that’s what you have. Use the same amount, but your cookies might spread a bit more.
- White chocolate chips: Feel free to swap these for semi-sweet chocolate chips, milk chocolate chips, or even dark chocolate for a different flavor combo. You could also try chopped white chocolate bars for bigger chunks.
- Eggs: Room temperature eggs work best for mixing, but if you forgot to take them out, just place them in a bowl of warm water for 5-10 minutes before using.
- Powdered sugar: The powdered sugar coating is what gives these cookies their crinkle look, so don’t skip it. But if you’re in a pinch, you can make your own by blending regular sugar in a blender until it’s fine and powdery.
Watch Out for These Mistakes While Baking
The biggest mistake with crinkle cookies is skipping the chilling step – if you try to roll warm dough, it’ll stick to your hands and won’t hold its shape, so refrigerate the dough for at least 30 minutes before rolling into balls.
Another common error is not coating the cookies generously enough in powdered sugar, which means you won’t get those signature crinkle cracks, so roll each dough ball twice in the sugar mixture for the best effect.
Overbaking is easy to do since these cookies should look slightly underdone when you pull them out – remove them from the oven when the edges are set but the centers still look soft, as they’ll continue cooking on the hot pan.
Finally, make sure your butter is cooled to room temperature before mixing it with the eggs, otherwise you’ll end up with scrambled bits in your dough.

What to Serve With Red Velvet White Chocolate Crinkle Cookies?
These cookies are perfect for holiday cookie platters alongside other favorites like sugar cookies, gingerbread, or chocolate chip cookies. A cold glass of milk is always the go-to pairing, but they’re also really good with hot chocolate or a cup of coffee if you’re enjoying them as an afternoon treat. For a fun dessert spread, serve them with vanilla ice cream or use them to make ice cream sandwiches – the white chocolate chips pair beautifully with vanilla. You can also pack them up in decorative tins or boxes to give as homemade gifts during the holidays, since they stay soft and chewy for several days.
Storage Instructions
Store: Keep these cookies in an airtight container at room temperature for up to 5 days. I like to layer them with parchment paper so they don’t stick together. They’ll stay soft and chewy, though the powdered sugar coating might settle a bit over time.
Freeze: These cookies freeze really well for up to 3 months. You can freeze them baked in a freezer-safe container, or freeze the dough balls before rolling in powdered sugar. If freezing the dough, just roll them in the sugar right before baking from frozen, adding an extra minute or two to the bake time.
Enjoy: If you’ve frozen baked cookies, let them thaw at room temperature for about 30 minutes before serving. You can dust them with a little extra powdered sugar if needed to freshen up their look. They taste amazing straight from the freezer too if you like a firmer texture!
| Preparation Time | 30-40 minutes |
| Cooking Time | 9-11 minutes |
| Total Time | 39-51 minutes |
| Level of Difficulty | Easy |
Estimated Nutrition
Estimated nutrition for the whole recipe (without optional ingredients):
- Calories: 3350-3550
- Protein: 30-36 g
- Fat: 135-145 g
- Carbohydrates: 470-490 g
Ingredients
For the cookie dough:
- 1/4 cup unsweetened cocoa powder (for deeper chocolate flavor)
- 18.25 oz red velvet cake mix (Duncan Hines or your preferred brand)
- 2 large eggs (room temperature)
- 6 tbsp butter (softened to room temperature)
- 1 tsp vanilla extract (pure vanilla preferred)
- 1 cup white chocolate chips (or white chocolate chunks for chewier texture)
For the coating:
- 3/4 cup powdered sugar (sifted to remove lumps)
- 1 tsp cornstarch (prevents coating from sticking)
Step 1: Prepare the Powdered Sugar Coating
- 3/4 cup powdered sugar
- 1 tsp cornstarch
In a small bowl, whisk together the sifted powdered sugar and cornstarch with a fork until well combined and free of lumps.
This coating mixture will be used later to create the signature crinkled appearance, so ensure it’s smooth and lump-free.
Set this bowl aside for now.
Step 2: Mix the Cookie Dough Base
- 18.25 oz red velvet cake mix
- 6 tbsp butter
- 1/4 cup unsweetened cocoa powder
- 2 large eggs
- 1 tsp vanilla extract
- 1 cup white chocolate chips
In a large mixing bowl, combine the red velvet cake mix, softened butter, unsweetened cocoa powder, room temperature eggs, and vanilla extract.
Mix until just combined—the dough will be thick and rich.
The cocoa powder adds deeper chocolate notes that complement the red velvet flavor beautifully.
Fold in the white chocolate chips gently, distributing them evenly throughout the dough.
Step 3: Chill the Dough
- dough mixture from Step 2
Cover the bowl with plastic wrap and refrigerate the dough for 30 minutes.
This chilling time allows the flavors to meld and makes the dough easier to handle when rolling into balls.
I find that chilled dough is less sticky and creates more defined crinkles when baked.
Step 4: Prepare the Oven and Workspace
While the dough chills, preheat your oven to 375°F and line your cookie sheets with parchment paper.
This prep work ensures you’re ready to bake as soon as the dough is ready, keeping the workflow smooth and efficient.
Step 5: Roll and Coat the Cookies
- chilled dough from Step 3
- powdered sugar coating mixture from Step 1
Remove the chilled dough from the refrigerator.
Using a 1-inch cookie scoop or measuring spoon, roll the dough into uniform balls and immediately roll each ball in the powdered sugar and cornstarch mixture from Step 1, coating all sides generously.
The coating should be visible and generous—this creates the beautiful crinkled texture as the cookies bake.
Space the coated dough balls 2 inches apart on the prepared cookie sheets, as they will spread slightly during baking.
Step 6: Bake and Cool
- coated dough balls from Step 5
Bake for 9 to 11 minutes at 375°F—the cookies should look underbaked with crinkled white coating and slightly soft centers.
Remove from the oven and let the cookies rest on the baking sheet for 2 to 3 minutes before transferring to a cooling rack.
I always let them rest on the pan first because this allows the residual heat to firm them up just enough so they hold their shape when moved, preventing them from falling apart.
Irresistible Red Velvet White Chocolate Crinkle Cookies
Ingredients
Method
- In a small bowl, whisk together the sifted powdered sugar and cornstarch with a fork until well combined and free of lumps. This coating mixture will be used later to create the signature crinkled appearance, so ensure it's smooth and lump-free. Set this bowl aside for now.
- In a large mixing bowl, combine the red velvet cake mix, softened butter, unsweetened cocoa powder, room temperature eggs, and vanilla extract. Mix until just combined—the dough will be thick and rich. The cocoa powder adds deeper chocolate notes that complement the red velvet flavor beautifully. Fold in the white chocolate chips gently, distributing them evenly throughout the dough.
- Cover the bowl with plastic wrap and refrigerate the dough for 30 minutes. This chilling time allows the flavors to meld and makes the dough easier to handle when rolling into balls. I find that chilled dough is less sticky and creates more defined crinkles when baked.
- While the dough chills, preheat your oven to 375°F and line your cookie sheets with parchment paper. This prep work ensures you're ready to bake as soon as the dough is ready, keeping the workflow smooth and efficient.
- Remove the chilled dough from the refrigerator. Using a 1-inch cookie scoop or measuring spoon, roll the dough into uniform balls and immediately roll each ball in the powdered sugar and cornstarch mixture from Step 1, coating all sides generously. The coating should be visible and generous—this creates the beautiful crinkled texture as the cookies bake. Space the coated dough balls 2 inches apart on the prepared cookie sheets, as they will spread slightly during baking.
- Bake for 9 to 11 minutes at 375°F—the cookies should look underbaked with crinkled white coating and slightly soft centers. Remove from the oven and let the cookies rest on the baking sheet for 2 to 3 minutes before transferring to a cooling rack. I always let them rest on the pan first because this allows the residual heat to firm them up just enough so they hold their shape when moved, preventing them from falling apart.